
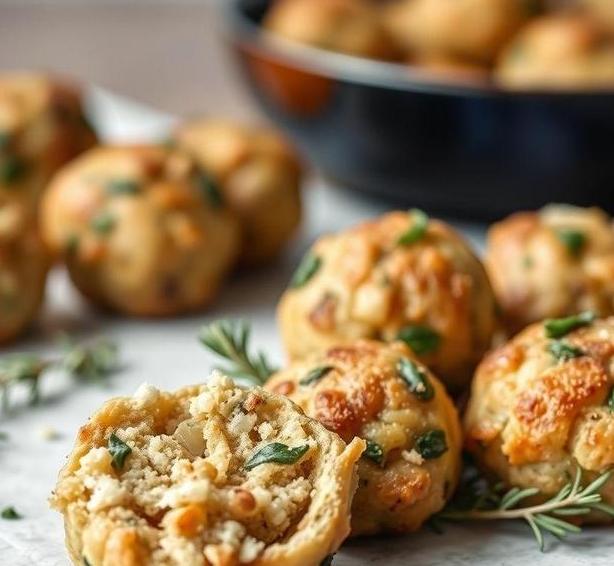
Mary Berry Sage And Onion Stuffing Balls Recipe [Tips & Tricks]
Note: This page contains affiliate links.
As an Amazon Associate, I earn from qualifying purchases when you click on the link, but you are not charged extra.
If you’re looking for the ultimate comfort food side dish to elevate your holiday meals or Sunday roasts, you absolutely have to try Mary Berry’s sage and onion stuffing balls. They’re the perfect combination of savory, herby goodness with a crispy outer layer and a soft, flavorful center.
Mary Berry, known for her classic British recipes, brings together the perfect balance of sage, onion, and seasoning in this easy-to-make recipe. Whether you’re a seasoned cook or a beginner, these stuffing balls will impress your guests and leave everyone asking for seconds!.
Mary Berry Sage And Onion Stuffing Balls Recipe
Ingredients Needed
To make Mary Berry’s Sage and Onion Stuffing Balls, you’ll need a range of simple, yet flavorful ingredients that come together to create a dish that’s the perfect combination of savory and aromatic. Here’s a breakdown of the key ingredients:
-
Breadcrumbs – Fresh white breadcrumbs are ideal as they provide the right texture and absorb the flavor of the herbs and other ingredients well. You can make these by processing white bread or buy pre-made breadcrumbs if you’re pressed for time.
-
Onions – A couple of medium onions will bring a sweet, fragrant depth to the stuffing. When sautéed, they soften and become caramelized, enhancing the overall flavor of the dish.
-
Sage – Fresh sage is a must in this recipe. It gives the stuffing its signature herby, slightly peppery flavor. Dried sage can also be used if fresh isn’t available, but fresh is always preferable for its brighter, more fragrant taste.
-
Butter – Butter is key in achieving a rich, golden finish to the stuffing balls. It’s used both to sauté the onions and to coat the stuffing mixture before baking, adding moisture and flavor.
-
Eggs – Eggs help bind the stuffing mixture together, ensuring the balls hold their shape during baking. They also add richness and contribute to the overall texture of the dish.
-
Stock – A little bit of chicken or vegetable stock helps to moisten the breadcrumbs, ensuring the stuffing balls are neither too dry nor too soggy. It infuses a lovely depth of flavor into the mix.
-
Salt and Pepper – Seasoning with salt and pepper ensures the stuffing balls have the right balance of flavors. You can adjust the seasoning to taste.
Optional ingredients may include a pinch of nutmeg or a sprinkle of grated Parmesan cheese for a little added flair.
Equipment Needed
Making Mary Berry’s Sage and Onion Stuffing Balls requires only a few essential pieces of kitchen equipment. While the recipe is straightforward, the right tools make the process smooth and enjoyable.
-
Large Frying Pan – This is essential for sautéing the onions in butter until they are golden and fragrant. A large pan ensures you can cook the onions evenly without overcrowding.
-
Mixing Bowl – A large mixing bowl is necessary for combining all the ingredients, including the breadcrumbs, sautéed onions, herbs, stock, and eggs. It gives you enough room to mix without making a mess.
-
Wooden Spoon or Silicone Spatula – A wooden spoon or spatula is great for stirring the mixture together. The gentle nature of these tools won’t damage the breadcrumbs or herbs, ensuring a delicate mix.
-
Baking Tray – A flat baking tray is where the stuffing balls will be placed for baking. Lining the tray with parchment paper or greasing it lightly will help prevent sticking.
-
Hands (Optional) – Though not strictly an equipment item, your hands will be needed to shape the stuffing mixture into neat, compact balls. The process is simple but hands-on.
-
Sharp Knife – For chopping the onions and any herbs, a sharp knife ensures you can slice them finely and easily.
-
Measuring Cups and Spoons – Accurate measurements are key in this recipe, so having measuring spoons and cups handy will ensure you get the right balance of ingredients, particularly for herbs and stock.
How To Make Mary Berry’s Sage And Onion Stuffing Balls
Making these delicious sage and onion stuffing balls is a relatively simple process that requires a bit of patience but results in an incredibly flavorful side dish. Here’s a step-by-step guide:
-
Prepare The Onions And Herbs
Begin by finely chopping your onions and fresh sage. In a large frying pan, melt a generous amount of butter over medium heat.
Add the onions to the pan and cook them gently, stirring occasionally, until they are soft, golden, and slightly caramelized, which usually takes about 8-10 minutes. The sweet, cooked onions will form the base of the flavor.
-
Combine The Breadcrumbs And Herbs
While the onions are cooking, place your breadcrumbs in a large mixing bowl. Add the chopped sage and a pinch of salt and pepper.
If you’re using additional spices like nutmeg, add them here too. Stir gently to combine all the ingredients and release the fragrance of the herbs.
-
Incorporate The Sautéed Onions
Once the onions have softened and taken on a lovely golden hue, transfer them into the mixing bowl with the breadcrumbs and sage. Stir everything together, ensuring the breadcrumbs absorb all the butter and the fragrant onions. The mixture should be moist but not soggy.
-
Add The Stock And Eggs
Pour in the stock (either chicken or vegetable) and crack in the eggs. The stock will help bind the stuffing, while the eggs will give the balls their structure. Stir the mixture thoroughly until it all comes together into a sticky, cohesive texture.
-
Shape The Stuffing Balls
Now it’s time to form the stuffing into balls. With clean hands, scoop up small portions of the mixture and roll them between your palms to create 1 to 2-inch balls.
Place each ball onto the prepared baking tray. Continue until all the mixture is used up.
-
Bake The Stuffing Balls
Preheat your oven to 375°F (190°C). Bake the stuffing balls for about 25-30 minutes, or until they are golden brown and crisp on the outside. You may wish to turn them halfway through baking for an even golden color on all sides.
-
Serve And Enjoy
Once the stuffing balls are perfectly crisp and golden, remove them from the oven. Serve them alongside your favorite roast dishes, such as roast chicken, turkey, or pork, and enjoy the rich, herb-infused flavor with every bite.
Expert Tips
To ensure your Sage and Onion Stuffing Balls turn out perfect, here are some expert tips:
-
Use Fresh Breadcrumbs: If you use stale or pre-made breadcrumbs, the texture of the stuffing balls could end up too dry. Fresh breadcrumbs, made from day-old white bread, will provide a more tender and moist stuffing.
-
Don’t Skip the Sautéing Step: Cooking the onions in butter until golden is essential to bring out their natural sweetness and flavor. Don’t rush this step-allow the onions to caramelize properly for the best taste.
-
Adjust the Herbs: While sage is the star of the dish, feel free to experiment by adding other herbs like thyme or parsley for a personal touch. Just keep the ratio in balance to maintain the classic sage flavor.
-
Make Ahead: You can prepare the stuffing balls in advance and store them in the fridge for a few hours before baking. This makes them a great option for meal prep or holiday meals when you want to save time.
-
Texture Control: If you prefer a firmer stuffing ball, use less stock; for a softer, more tender ball, you can add a little extra liquid. It’s all about balancing the texture to your liking.
-
Crispier Finish: For an extra crispy finish, drizzle a little more butter or olive oil over the stuffing balls just before baking. This will help them brown beautifully in the oven.
Mary Berry’s Sage and Onion Stuffing Balls are a delightful and comforting addition to any meal, especially a Sunday roast or a festive feast. With their golden, crisp exterior and moist, herb-infused interior, these stuffing balls combine classic flavors that appeal to just about everyone.
The recipe itself is straightforward, making it a perfect option even for novice cooks, yet it delivers impressive results that showcase a balance of flavors and textures. Whether served with turkey, chicken, or pork, these stuffing balls will elevate your meal with their aromatic appeal and satisfying texture. Plus, the flexibility to adapt the recipe with extra herbs or spices means you can customize them to fit your taste.
Try this recipe, and you’ll find that these sage and onion stuffing balls become an indispensable part of your go-to comfort food repertoire.
Easy Recipe Variations For Mary Berry’s Sage And Onion Stuffing Balls
Mary Berry’s Sage and Onion Stuffing Balls are a timeless favorite, offering a perfect blend of comforting flavors and textures. However, the beauty of this recipe lies in its versatility.
You can easily adapt it to suit different tastes, dietary needs, or simply to experiment with new flavor combinations. Here are a few easy variations to elevate your stuffing balls:.
-
Herb Infusion: While sage and onion are classic, you can infuse your stuffing balls with additional herbs like thyme, rosemary, or parsley. These herbs complement the sage’s earthy notes and give the stuffing a more aromatic finish. A mix of thyme and rosemary will also lend a slightly woodsy flavor, perfect for a hearty winter meal.
-
Cheese Lovers’ Delight: For a rich, indulgent twist, add grated cheese to your stuffing mix. Cheddar, Gruyère, or even a sharp Parmesan can melt through the stuffing balls as they bake, giving them a cheesy, savory depth. The cheese will also add moisture and richness, making the stuffing balls slightly more decadent.
-
Cranberry and Nut Variation: For a festive touch, fold dried cranberries and chopped nuts-such as walnuts, pecans, or hazelnuts-into your stuffing mixture. The tartness of the cranberries provides a sweet contrast to the sage and onion, while the nuts add a satisfying crunch. This variation is especially perfect for holiday dinners.
-
Vegetarian and Vegan-Friendly Adaptation: To make a vegetarian or vegan version of Mary Berry’s stuffing balls, simply swap out the butter for plant-based margarine and the eggs for a flaxseed or chia seed egg substitute. If you’re looking for a richer flavor, consider adding sautéed mushrooms or diced roasted vegetables like carrots and zucchini to enhance the stuffing’s texture and depth.
-
Sausage Stuffing Balls: For a more substantial stuffing ball, you can incorporate sausage meat into the mix. This adds savory flavors and a tender, meaty texture to the stuffing. Simply crumble cooked sausage into the stuffing mixture before forming into balls. This variation is a great way to add protein and a richer taste to your dish.
-
Gluten-Free Option: If you need to make the stuffing balls gluten-free, replace the regular bread crumbs with gluten-free breadcrumbs or gluten-free cornbread. You may also need to adjust the binding agents, such as adding an extra egg or using a bit of cornstarch to ensure the stuffing balls hold together well.
These variations allow you to customize the stuffing balls according to your personal preferences and dietary requirements, ensuring that they remain a crowd-pleasing addition to any meal.
Best Practices To Store Leftovers

Sage and onion stuffing balls are not only a delightful side dish but also a great leftover option. Storing them properly can keep them fresh for future meals, allowing you to enjoy the flavors well after the main event. Here’s how to store your leftover stuffing balls properly:
-
Cool Before Storing: Always allow the stuffing balls to cool completely before storing them. This prevents moisture from building up inside the storage container, which could lead to sogginess and reduce their shelf life. Leave them out at room temperature for about 30 minutes to an hour.
-
Refrigeration: For short-term storage, place the stuffing balls in an airtight container and store them in the refrigerator. They will typically last for 3-4 days when refrigerated. Ensure the container is tightly sealed to prevent the stuffing from absorbing any odors from other foods.
-
Freezing Leftovers: If you have more stuffing balls than you can eat within a few days, freezing them is a great option. Arrange the stuffing balls in a single layer on a baking sheet and freeze them for about 1-2 hours, or until solid. This step prevents the stuffing balls from sticking together in a clump. Once frozen, transfer them into a freezer-safe bag or container, making sure to squeeze out excess air. They will last for up to 2-3 months in the freezer. To reheat, you can bake them directly from frozen at 350°F (175°C) for about 20 minutes, or until heated through.
-
Reheating: When reheating refrigerated or frozen stuffing balls, the best method is to warm them in the oven. This helps to retain their crispy exterior and moist interior. Preheat your oven to 350°F (175°C) and bake the stuffing balls for about 10-15 minutes, or until they’re hot and golden. You can also reheat them in the microwave, but be cautious not to overheat, as this can dry them out. If microwaving, place a damp paper towel over the stuffing balls to retain moisture.
-
Storage Tips for Sausage Variants: If your stuffing balls contain sausage, make sure to consume them within a few days when refrigerated, as they will not last as long as vegetarian versions. For freezing, consider checking the sausage’s original expiration date to ensure safe storage.
By following these storage practices, you can enjoy your sage and onion stuffing balls for days after making them, without sacrificing their flavor or texture.
What Goes Well With Sage And Onion Stuffing Balls
Sage and onion stuffing balls are an incredibly versatile dish that can be paired with a wide array of main courses and sides. Whether you’re preparing a classic roast dinner or looking for something new, here are some ideas for what goes well with these stuffing balls:
-
Roast Meats: The natural companion to sage and onion stuffing balls is, of course, roast meats. They are a perfect addition to roast turkey, chicken, or duck, as the earthy flavors of sage and onion complement the richness of the meat. For a particularly festive meal, they pair beautifully with a roast Christmas turkey, offering a flavorful contrast to the delicate white meat.
-
Gravy: No stuffing ball would be complete without a generous pour of rich gravy. Whether you’re making a traditional turkey gravy, beef gravy, or even a vegetarian mushroom gravy, the savory sauce enhances the stuffing’s flavors, creating a harmonious plate. If you’ve used sausage in your stuffing, a rich, dark gravy made with the drippings from the roasted meat pairs excellently.
-
Vegetable Sides: The stuffing balls balance beautifully with roasted vegetables. Root vegetables like carrots, parsnips, sweet potatoes, and butternut squash add a touch of sweetness that complements the savory stuffing. A side of Brussels sprouts or green beans also works well, especially if you sauté them with a little garlic and butter to keep the flavor profile cohesive.
-
Cranberry Sauce: For a delightful contrast, serve your stuffing balls with a dollop of cranberry sauce. The sweet and tangy flavor of cranberries cuts through the savory stuffing, offering a fresh burst of flavor with every bite. This combination is especially fitting for holiday dinners.
-
Salads: If you’re looking for something lighter to balance the richness of the stuffing, a fresh salad is the perfect choice. A simple mixed greens salad with a light vinaigrette or a tangy citrus-based salad can help balance out the meal. Adding a few roasted nuts or seeds to the salad adds texture and makes it feel more substantial.
-
Casseroles: Sage and onion stuffing balls can also pair wonderfully with casseroles, particularly those involving cream-based sauces like a cauliflower cheese casserole or a creamy spinach gratin. The contrast in textures between the creamy casseroles and the crispy stuffing balls creates a satisfying meal.
-
Pâté or Cold Cuts: For a more casual meal, sage and onion stuffing balls can be served alongside pâté, cold cuts, or cheeses. A charcuterie board with a selection of meats, cheeses, and olives pairs beautifully with these savory little bites.
Conclusion
Mary Berry’s Sage and Onion Stuffing Balls are an exquisite dish that effortlessly brings comfort and flavor to any table. Their versatility allows for endless variations, whether you’re looking to make them cheesy, herb-infused, or tailored for special dietary needs.
Storing leftovers is simple with the right techniques, ensuring you can enjoy these savory treats for days to come. Additionally, their ability to complement a wide range of meats, vegetables, and sauces makes them an indispensable side dish.
Whether you’re preparing a traditional holiday feast or a weeknight dinner, sage and onion stuffing balls offer a delicious, satisfying option that pairs well with virtually anything. Their warm, flavorful bite is the perfect addition to any meal, making them a must-have in your recipe repertoire.
FAQs
What Ingredients Do I Need For Mary Berry’s Sage And Onion Stuffing Balls?
For Mary Berry’s sage and onion stuffing balls, you will need the following ingredients: 1 onion, 50g butter, 2 tablespoons fresh sage (chopped), 250g fresh white breadcrumbs, 1 large egg, salt and pepper to taste, and a small amount of vegetable or chicken stock.
Can I Use Dried Sage Instead Of Fresh Sage For This Recipe?
Yes, you can substitute dried sage for fresh sage, but the flavor may be less vibrant. Use about 1 tablespoon of dried sage for every 2 tablespoons of fresh sage.
How Do I Make Sure My Stuffing Balls Stay Together During Cooking?
To ensure your stuffing balls stay together, be sure to mix the ingredients thoroughly, using the egg as a binding agent. If the mixture feels too dry, you can add a little more stock to achieve a firmer, dough-like consistency.
Can I Make The Stuffing Balls In Advance?
Yes, you can make Mary Berry’s sage and onion stuffing balls ahead of time. Prepare the stuffing mixture and form the balls, then place them on a baking tray. You can refrigerate them for up to 24 hours before cooking.
How Long Do I Bake Mary Berry’s Sage And Onion Stuffing Balls?
Bake the stuffing balls at 180°C (160°C fan) or 350°F for about 25-30 minutes until they are golden brown and crispy on the outside.
Can I Freeze The Stuffing Balls?
Yes, you can freeze the stuffing balls. After forming them, place them on a baking tray and freeze them individually.
Once frozen, transfer them to a freezer bag or container. To cook, bake directly from frozen, adding an extra 5-10 minutes to the baking time.
What Type Of Breadcrumbs Should I Use For Mary Berry’s Sage And Onion Stuffing Balls?
For the best results, use fresh white breadcrumbs for Mary Berry’s sage and onion stuffing balls. They will provide a light and fluffy texture. You can also use wholemeal breadcrumbs for a slightly more rustic flavor.
Can I Add Other Ingredients To The Stuffing Mixture, Like Sausage Or Chestnuts?
Yes, you can customize Mary Berry’s sage and onion stuffing balls by adding extras like cooked sausage meat, chestnuts, or cranberries. Just ensure that any additional ingredients are finely chopped or crumbled, so they mix evenly with the stuffing.
How Do I Store Leftovers Of Mary Berry’s Sage And Onion Stuffing Balls?
Store any leftover stuffing balls in an airtight container in the fridge for up to 3 days. You can also freeze them for up to 3 months. Reheat thoroughly before serving.
Can I Make The Stuffing Balls Without Butter For A Lighter Version?
Yes, you can substitute butter with olive oil or vegetable oil to create a lighter version of Mary Berry’s sage and onion stuffing balls. You can also try using a reduced-fat spread for a lower-calorie alternative.
![Mary Berry Mexican Chicken Recipe [Tips & Tricks]](https://famousyummyrecipes.com/wp-content/uploads/2025/03/mexican-chicken.jpg)
![Mary Berry Blackberry And Apple Crumble Recipe [Tips & Tricks]](https://famousyummyrecipes.com/wp-content/uploads/2025/03/blackberry-and-apple-crumble.jpg)
![Mary Berry Chocolate Cappuccino Tart Recipe [Tips & Tricks]](https://famousyummyrecipes.com/wp-content/uploads/2025/03/chocolate-cappuccino-tart.jpg)
![Mary Berry Cauliflower Soup Recipe [Tips & Tricks]](https://famousyummyrecipes.com/wp-content/uploads/2025/03/cauliflower-soup.jpg)
![Mary Berry Hot Cross Bun Loaf Recipe [Tips & Tricks]](https://famousyummyrecipes.com/wp-content/uploads/2025/03/hot-cross-bun-loaf.jpg)
![Mary Berry Ultimate Chocolate Brownies Recipe [Tips & Tricks]](https://famousyummyrecipes.com/wp-content/uploads/2025/03/ultimate-chocolate-brownies.jpg)