
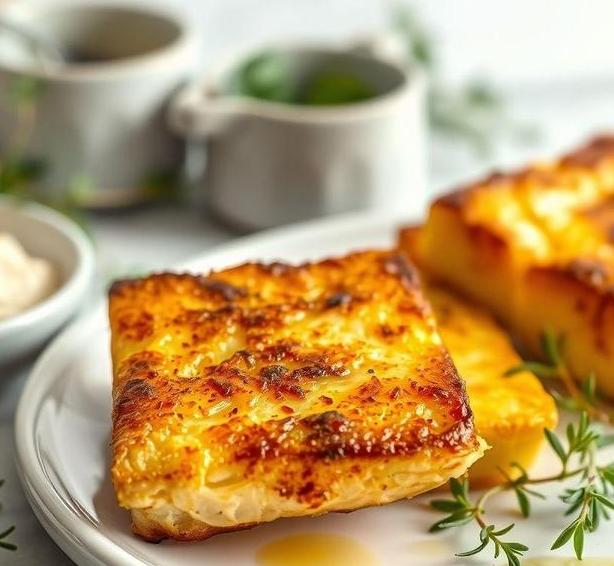
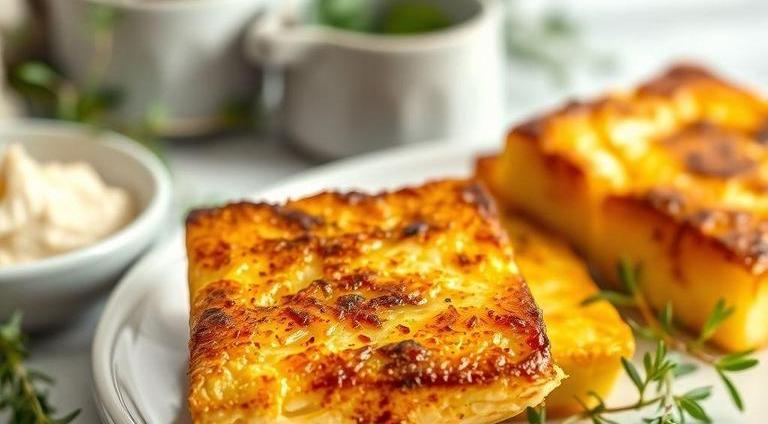
Mary Berry Pan Fried Halloumi Recipe [Tips & Tricks]
Note: This page contains affiliate links.
As an Amazon Associate, I earn from qualifying purchases when you click on the link, but you are not charged extra.
If you’re looking for a quick and delicious way to enjoy halloumi, Mary Berry’s pan fried halloumi recipe is an absolute must-try!
This simple yet flavorful dish takes the iconic salty cheese to the next level with a perfect crispy exterior and a soft, creamy inside. It’s a fantastic option for a light lunch, a snack, or even as a side to your main meal. Plus, Mary Berry’s easy-to-follow instructions make it approachable for cooks of all skill levels, so whether you’re a beginner or a seasoned chef, you’ll be able to whip up this irresistible dish in no time!
Mary Berry Pan Fried Halloumi Recipe
Ingredients Needed
To make Mary Berry’s Pan Fried Halloumi, you’ll need a handful of simple yet essential ingredients that come together to create this flavorful and satisfying dish. Halloumi cheese is the star of the recipe, but the supporting cast of ingredients brings out its savory, slightly salty, and wonderfully textured qualities.
-
Halloumi Cheese
Halloumi is a semi-hard cheese that originates from Cyprus. It has a high melting point, which makes it perfect for grilling or pan-frying.
Its texture is firm, slightly rubbery, and it boasts a rich, salty flavor. For this recipe, you’ll need approximately 250-300g of halloumi, depending on how many people you’re serving. The cheese should be sliced into thick pieces, usually about 1 cm each, to ensure it fries nicely and retains its shape.
-
Olive Oil
Olive oil is a key ingredient for frying halloumi. It adds richness and a subtle fruity flavor to the dish.
Use extra virgin olive oil for its aromatic, robust taste. You’ll need about 1-2 tablespoons, enough to coat the pan evenly.
-
Lemon
A squeeze of fresh lemon juice is essential for balancing the saltiness of the halloumi. It adds a bright, zesty tang to the dish, enhancing the cheese’s richness. You’ll need half a lemon to zest and juice, with the juice to drizzle over the fried cheese just before serving.
-
Fresh Herbs
Fresh herbs like thyme, rosemary, or mint complement the halloumi beautifully. Fresh thyme is often used in this recipe, adding a fragrant, earthy undertone that elevates the dish. A few sprigs should be sufficient for garnishing the fried halloumi, though you can experiment with other herbs based on your preference.
-
Optional: Garlic
Garlic, finely minced or crushed, can be sautéed in the olive oil before adding the halloumi. While optional, it contributes an extra layer of depth and fragrance to the dish. If you’re a fan of garlic, it’s a lovely addition.
Equipment Needed
Making Mary Berry’s Pan Fried Halloumi is simple, but there are a few key pieces of equipment that will make the process seamless and ensure your dish turns out perfectly crispy and golden. Here’s what you’ll need:
-
Non-Stick Frying Pan
A non-stick frying pan is essential for this recipe. It ensures that the halloumi fries evenly and doesn’t stick to the surface, allowing for a beautiful golden crust to form without any hassle. The size of the pan should be large enough to comfortably fit the halloumi slices without overcrowding, which allows for even cooking.
-
Tongs or a Spatula
To flip and move the halloumi slices in the pan, a pair of tongs or a spatula is incredibly useful. Halloumi can be delicate, and using the right tool helps you handle it gently while preventing it from breaking apart.
-
Knife and Chopping Board
You’ll need a sharp knife to slice the halloumi cheese into even pieces. A chopping board will make the task easier and safer, especially when handling the cheese before it goes into the pan.
-
Citrus Zester or Grater
If you want to zest the lemon, a citrus zester or fine grater is handy. Zesting the lemon adds a refreshing fragrance and a burst of flavor to the halloumi, so this tool will make sure you get all of those aromatic oils from the lemon peel.
-
Serving Plate
Once the halloumi is cooked, you’ll need a serving plate to arrange it beautifully. A simple white plate will allow the golden-brown halloumi to shine, but you can use anything that suits the vibe of your meal.
How To Make Mary Berry’s Pan Fried Halloumi
Making Mary Berry’s Pan Fried Halloumi is a straightforward process, but the key to getting it just right lies in frying the cheese to golden perfection. Here’s how to do it:
-
Prepare the Ingredients
Start by slicing the halloumi cheese into thick slices, approximately 1 cm in thickness. This will ensure that the halloumi crisps up nicely on the outside while staying firm on the inside.
Set the slices aside. If you’re using garlic, chop it finely, and zest the lemon.
-
Heat the Pan
Place your non-stick frying pan on medium heat and add the olive oil. Allow the oil to heat up until it shimmers, but avoid letting it smoke. If you’re using garlic, add it to the oil and sauté for about 30 seconds, just long enough for it to release its aroma and soften, but be careful not to burn it.
-
Fry the Halloumi
Once the oil is ready, gently place the halloumi slices into the pan. Fry the slices for 2-3 minutes on each side, or until they are golden and crispy.
Be mindful not to overcrowd the pan-cook in batches if needed. Use tongs or a spatula to flip the halloumi carefully, ensuring each slice gets a nice even browning.
-
Finish the Dish
After all the halloumi is fried, transfer it to a serving plate. Drizzle freshly squeezed lemon juice over the hot cheese for a burst of citrusy flavor.
For added fragrance, you can sprinkle lemon zest and garnish with fresh herbs, such as thyme or rosemary. If you like, a small drizzle of honey or a sprinkle of chili flakes can offer an extra dimension of flavor.
-
Serve Immediately
Mary Berry’s Pan Fried Halloumi is best served immediately while it’s warm and crispy. The texture should be golden on the outside, slightly crispy, and tender on the inside. It pairs wonderfully with fresh salads, roasted vegetables, or a tangy yogurt dip for added depth.
Expert Tips
-
Choosing the Right Halloumi
Opt for high-quality halloumi for the best results. Some brands can be more rubbery and less flavorful, so look for one that is firm but has a slightly moist interior. If possible, seek out halloumi that has been imported from Cyprus or Greece for an authentic taste.
-
Don’t Overcrowd the Pan
It’s tempting to fry all the halloumi at once, but overcrowding the pan can lead to uneven cooking. The cheese needs room to crisp up, so cook in batches if necessary. This will ensure that each slice gets golden and crispy on all sides.
-
Use Medium Heat
Cooking at medium heat ensures that the halloumi gets a golden, crispy crust without burning. If the heat is too high, the outside might brown too quickly, leaving the inside raw. If the heat is too low, the halloumi will just get soggy.
-
Experiment with Seasonings
While Mary Berry’s recipe is simple and delicious on its own, feel free to get creative with your seasonings. A sprinkle of smoked paprika or some crushed red pepper flakes will add a smoky or spicy kick to the dish. Alternatively, a drizzle of balsamic glaze can add a touch of sweetness.
-
Pair with Complementary Sides
Pan Fried Halloumi is incredibly versatile and pairs well with a wide variety of sides. It’s a great addition to a Mediterranean-inspired platter, served alongside hummus, olives, and roasted vegetables. It also goes wonderfully with fresh salads, where the warm cheese contrasts beautifully with crisp, cool ingredients.
Mary Berry’s Pan Fried Halloumi is a delightful, easy-to-make dish that brings out the best in this uniquely textured cheese. With its crispy exterior, creamy interior, and the added zing of lemon and fresh herbs, this dish is sure to impress at any meal.
Whether you’re serving it as an appetizer, side dish, or even as a main for a light vegetarian meal, pan-fried halloumi offers a perfect balance of flavors and textures. By following the simple steps, using quality ingredients, and adding a personal touch with expert tips, you can create a dish that’s both comforting and elegant. So, get your pan sizzling and enjoy the crispy, salty goodness of this delightful cheese!.
Easy Recipe Variations For Mary Berry’s Pan Fried Halloumi
Mary Berry’s pan-fried halloumi recipe is a wonderfully simple and delicious dish, but there are many ways to adapt and elevate it depending on your tastes or what ingredients you have available. Halloumi’s firm texture and salty, savory flavor make it the perfect base for creativity in the kitchen. Below are a few easy and tasty variations to try:
-
Herb-Infused Halloumi
To bring a fresh, aromatic twist to the dish, add fresh herbs like rosemary, thyme, or basil while cooking the halloumi. Simply chop your herbs and sprinkle them over the halloumi slices as they fry. The herbs will infuse the cheese with subtle flavor and add color, creating an even more vibrant dish.
-
Halloumi with a Citrus Zing
A splash of lemon or orange juice before serving can cut through the richness of the cheese, adding a zesty brightness to the dish. Alternatively, you could zest the citrus over the fried halloumi for an extra layer of citrusy fragrance. For a more intense citrus experience, make a quick dressing by mixing olive oil, citrus juice, and a touch of honey for sweetness, and drizzle it over the cooked cheese.
-
Halloumi and Cherry Tomatoes
For a Mediterranean-inspired variation, toss some halved cherry tomatoes into the pan just before the halloumi finishes cooking. The heat will soften the tomatoes, making them burst with sweetness, which contrasts beautifully with the savory halloumi. This combination pairs well with a drizzle of balsamic reduction or a splash of red wine vinegar.
-
Spicy Halloumi with Paprika and Chili Flakes
If you enjoy a bit of heat, sprinkle paprika and red chili flakes over your halloumi as it cooks. These spices will give the cheese an extra kick and a smoky flavor. To enhance the spice, serve with a side of cooling yogurt or a minty dip to balance the heat.
-
Halloumi Salad
Turn your pan-fried halloumi into a full meal by serving it on a bed of fresh greens. Spinach, arugula, and rocket are great options for a light, peppery bite.
Add your favorite salad toppings such as cucumber, olives, or roasted vegetables, and finish it with a dressing of olive oil, lemon, and a bit of Dijon mustard. You can also top the salad with a few nuts, such as toasted pine nuts or almonds, for some crunch.
-
Halloumi with Pomegranate Seeds
For a sweet-and-savory fusion, serve your pan-fried halloumi with pomegranate seeds. The jewel-like seeds provide a burst of sweetness and a slight crunch that beautifully contrasts with the salty halloumi. A drizzle of honey or a touch of balsamic vinegar will enhance this pairing, giving it an exotic flair.
-
Grilled Halloumi Skewers
Another variation is to thread cubes of halloumi onto skewers, alternating with vegetables such as bell peppers, zucchini, or onions. Grill the skewers until the cheese is golden brown and slightly charred. Serve with a side of couscous, quinoa, or a refreshing tzatziki dip to complete the Mediterranean-inspired meal.
With these variations, the pan-fried halloumi can be customized to suit any palate, from light and fresh to rich and spicy. Whether you’re in the mood for something simple or fancy, these twists on Mary Berry’s recipe can elevate your dish in no time.
Best Practices To Store Leftovers
When you have leftover pan-fried halloumi, storing it properly is essential to maintain its texture and flavor. Halloumi is a versatile cheese that can be enjoyed again the next day if stored correctly, but it’s important to avoid common mistakes like leaving it uncovered or improperly sealed.
-
Cool the Halloumi Completely
Before storing leftover halloumi, let it cool to room temperature. If you put hot cheese into a container, the condensation can make the texture soggy, which is not ideal for halloumi’s firm, crispy exterior. Let it sit for about 10-15 minutes after cooking to ensure it cools properly.
-
Use an Airtight Container
Place the cooled halloumi in an airtight container. This helps to keep moisture out, preventing the cheese from becoming soggy or losing its fresh flavor. If you want to store multiple pieces, try to separate them with a layer of parchment paper or wax paper to keep them from sticking together.
-
Refrigeration
Halloumi can be stored in the refrigerator for up to 2-3 days. While it won’t retain its crispy exterior, it will still have its characteristic salty flavor. If you’re planning on using it in a salad or another dish, the flavor will still shine through, though the texture may change slightly.
-
Reheat Gently
To preserve its flavor when reheating, warm the leftover halloumi in a non-stick skillet over low heat. This will prevent it from becoming overly dry or tough.
Avoid microwaving halloumi as this can make it rubbery and unappetizing. A quick, gentle reheat in a pan is the best way to bring it back to life.
-
Freezing Leftovers (Optional)
Freezing leftover halloumi is an option, but it’s not ideal for preserving the perfect texture. If you plan to freeze it, cut the halloumi into smaller pieces, wrap them in plastic wrap, and then place them in a freezer bag.
When ready to use, thaw in the refrigerator overnight and reheat gently. However, note that frozen and thawed halloumi may be less firm and slightly crumblier than freshly cooked halloumi.
By following these simple practices, you can keep your leftovers fresh for a few days and enjoy the flavor of pan-fried halloumi even after the initial meal.
What Goes Well With Pan Fried Halloumi
Pan-fried halloumi is a versatile dish that pairs wonderfully with a variety of ingredients. Whether you’re serving it as a main or as part of a larger spread, it’s all about balancing the richness of the cheese with complementary flavors. Below are some top ideas for what to serve alongside your halloumi:
-
Fresh Salads
Halloumi’s salty, savory taste works beautifully with fresh greens. Try serving it with a Mediterranean-inspired salad made of arugula, cherry tomatoes, cucumber, red onions, and olives. A light vinaigrette dressing, perhaps with a touch of lemon juice, will cut through the richness of the cheese and elevate the dish.
-
Grains
Serve your halloumi alongside grains like couscous, quinoa, or bulgur. These grains provide a light, nutty base that pairs perfectly with the crispy cheese.
You could also mix them with roasted vegetables for a filling, hearty meal. A drizzle of olive oil and a sprinkle of herbs like parsley or cilantro will tie the whole dish together.
-
Roasted Vegetables
Roasted vegetables such as bell peppers, zucchini, or eggplant make an excellent pairing with pan-fried halloumi. The natural sweetness and slight char of roasted veggies contrast nicely with the saltiness of the cheese. A touch of balsamic vinegar or a squeeze of lemon juice can add an extra layer of flavor.
-
Flatbreads or Pita
Soft flatbreads or warm pita are a great way to scoop up pan-fried halloumi and any accompanying sauces or dips. The chewiness of the bread complements the crispy texture of the cheese, while also providing a satisfying base. For an extra touch, serve with hummus or tzatziki.
-
Tomato-Based Sauces
Pan-fried halloumi pairs nicely with tomato-based sauces, whether it’s a simple marinara, a spicy arrabbiata, or a rich tomato and basil sauce. The acidity of the tomatoes cuts through the cheese’s richness, balancing the flavors for a savory combination.
-
Fruits and Dips
Try pairing halloumi with fruits like watermelon, figs, or even pomegranate seeds. The sweetness of these fruits provides a beautiful contrast to the salty cheese. Additionally, yogurt-based dips like tzatziki or a simple garlic yogurt sauce bring a creamy, tangy element to the dish.
-
Grilled Meats
If you’re serving halloumi as part of a larger meal, it pairs exceptionally well with grilled meats. Chicken, lamb, or beef kebabs can enhance the overall flavor profile of your meal. The savory, smoky notes of the meat complement the saltiness of the halloumi, making for a balanced plate.
Conclusion
Mary Berry’s pan-fried halloumi is a delightful dish that’s both simple and sophisticated, offering a perfect balance of salty and savory flavors. It’s a versatile recipe that can be customized with various herbs, spices, and accompaniments, making it ideal for any occasion. Whether you prefer it as a main course, a side, or a salad topping, halloumi is a cheese that’s as adaptable as it is delicious.
By following the best practices for storing leftovers, you can ensure that the cheese stays fresh and enjoyable for days after cooking. Pairing pan-fried halloumi with a wide range of sides, from fresh salads to roasted vegetables and grains, provides endless opportunities to get creative in the kitchen.
Ultimately, this dish is one of those recipes that remains a staple in many homes because of its easy preparation, flavor depth, and versatility. Enjoy experimenting with different variations, and let your taste buds guide the way!.
FAQs
What Ingredients Are Needed For Mary Berry’s Pan Fried Halloumi Recipe?
To make Mary Berry’s pan fried halloumi, you will need halloumi cheese, olive oil, and optionally, herbs or spices for added flavor. Some versions may include lemon or garlic for extra zest.
How Do You Prepare The Halloumi For Pan Frying?
To prepare the halloumi for pan frying, slice the cheese into approximately 1cm thick slices. This helps ensure the cheese crisps up on the outside while staying soft inside during frying.
Can I Use A Non-stick Pan For Pan Frying Halloumi?
Yes, using a non-stick pan is ideal as it reduces the risk of the halloumi sticking. However, you should still use a small amount of oil to achieve a nice crisp texture.
How Long Should I Fry The Halloumi?
Fry the halloumi slices for about 2-3 minutes on each side or until they turn golden brown and crispy. Keep an eye on them to avoid burning, as halloumi can quickly overcook.
Can I Make Mary Berry’s Pan Fried Halloumi Recipe Without Oil?
While you can reduce the amount of oil, using some oil is recommended to ensure the halloumi crisps up properly. If you want a lighter version, you could try using a minimal amount of olive oil or opt for a spray oil.
Is Mary Berry’s Pan Fried Halloumi Recipe Suitable For Vegetarians?
Yes, Mary Berry’s pan fried halloumi recipe is vegetarian-friendly, as halloumi cheese is made from sheep’s or goat’s milk and does not contain any meat products.
Can I Add Seasonings Or Spices To The Pan Fried Halloumi?
Absolutely!
You can season the halloumi with various spices, herbs, or marinades. Common additions include black pepper, paprika, oregano, or garlic. You could also drizzle some lemon juice for added freshness.
Should I Cook The Halloumi On High Or Medium Heat?
It’s best to cook the halloumi on medium heat. High heat might cause it to burn too quickly, while medium heat allows for a crispy exterior and a nice soft inside.
Can I Serve Mary Berry’s Pan Fried Halloumi With A Sauce?
Yes, you can pair pan fried halloumi with a variety of sauces, such as a yogurt-based sauce, tzatziki, or a balsamic glaze. A simple squeeze of lemon or a drizzle of honey also complements the dish.
How Should I Store Leftover Pan Fried Halloumi?
Leftover pan fried halloumi should be stored in an airtight container in the refrigerator for up to 2 days. However, it’s best enjoyed fresh, as the texture may change upon reheating.
![Mary Berry Glazed French Peach Tart Recipe [Tips & Tricks]](https://famousyummyrecipes.com/wp-content/uploads/2025/03/glazed-french-peach-tart.jpg)
![Mary Berry Bramble Mousse Recipe [Tips & Tricks]](https://famousyummyrecipes.com/wp-content/uploads/2025/03/bramble-mousse.jpg)
![Mary Berry Chocolate Cupcakes With Ganache Icing Recipe [Tips & Tricks]](https://famousyummyrecipes.com/wp-content/uploads/2025/03/chocolate-cupcakes-with-ganache-icing.jpg)
![Mary Berry Pecan And Cinnamon Ripple Squares Recipe [Tips & Tricks]](https://famousyummyrecipes.com/wp-content/uploads/2025/03/pecan-and-cinnamon-ripple-squares.jpg)
![Mary Berry Clementine Cake Recipe [Tips & Tricks]](https://famousyummyrecipes.com/wp-content/uploads/2025/03/clementine-cake.jpg)
![Mary Berry Bakewell Tart Fingers Recipe [Tips & Tricks]](https://famousyummyrecipes.com/wp-content/uploads/2025/03/bakewell-tart-fingers.jpg)