
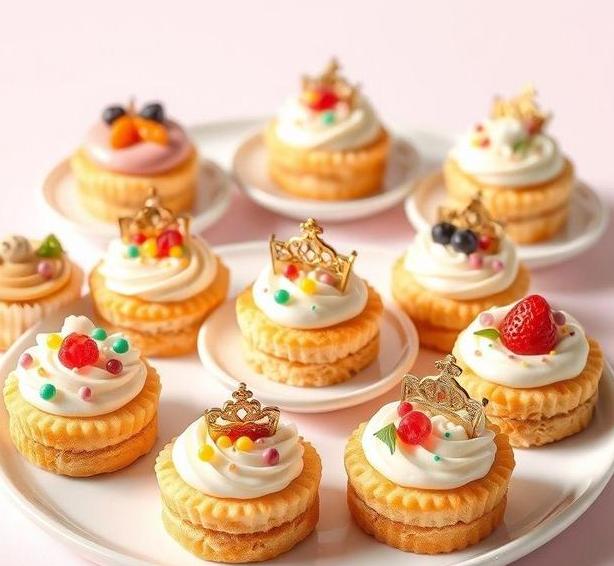
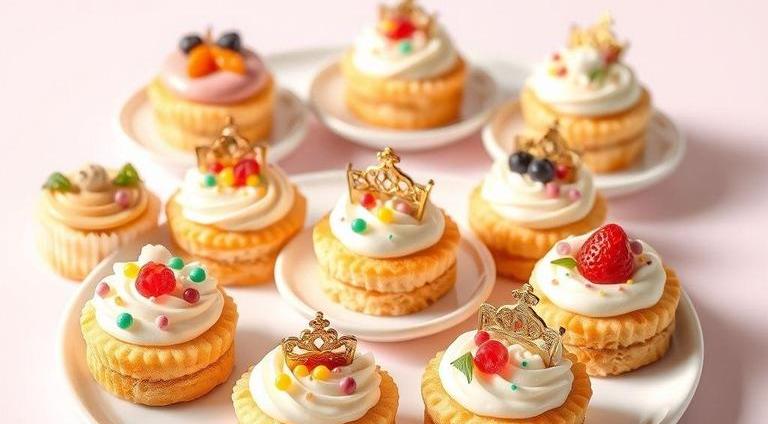
Mary Berry Queen Cakes Recipe [Tips & Tricks]
Note: This page contains affiliate links.
As an Amazon Associate, I earn from qualifying purchases when you click on the link, but you are not charged extra.
If you’re looking for a deliciously simple yet impressive treat, Mary Berry’s Queen Cakes recipe is an absolute must-try!
These delightful little cakes are light, fluffy, and packed with the perfect balance of sweetness, making them ideal for any occasion-whether it’s a cozy afternoon tea or a family celebration. With Mary Berry’s foolproof instructions, you don’t need to be an expert baker to create something special. Plus, the personal touch and timeless appeal of this recipe make it a fun and rewarding bake that everyone will adore!
Mary Berry Queen Cakes Recipe
Ingredients Needed
Mary Berry’s Queen Cakes are a delightful treat that combines the simplicity of classic British baking with the elegance of a royal-inspired cake. These mini, light sponge cakes are perfect for afternoon tea or a festive gathering. Here’s a breakdown of the ingredients you’ll need to make them:
-
Self-Raising Flour – 150g
The foundation of these cakes is self-raising flour, which helps the batter rise beautifully. Self-raising flour already contains baking powder, so you won’t need to add any extra leavening agents. The fine, soft texture of self-raising flour ensures the cakes are light and airy.
-
Caster Sugar – 150g
This finely ground sugar dissolves quickly in the batter, helping to create a smooth and even texture. It also contributes to the cakes’ delicate sweetness, not overpowering but just enough to balance the flavor.
-
Unsalted Butter – 150g
Butter adds richness and depth of flavor to the cakes. Mary Berry’s recipe calls for unsalted butter, giving you more control over the final taste and allowing you to adjust the saltiness if needed. It’s best to use butter at room temperature to ensure it mixes evenly with the other ingredients.
-
Eggs – 3 large
Eggs are key to binding the ingredients and providing structure to the cakes. They also contribute to the rich texture, giving the cakes their golden color and light crumb. Make sure your eggs are at room temperature for even incorporation.
-
Milk – 2 tablespoons
A splash of milk helps to loosen the batter, creating a slightly moist yet fluffy texture. It also enhances the overall flavor, making the cakes tender and soft.
-
Vanilla Extract – 1 teaspoon
This is a classic flavor enhancer, adding warmth and subtle sweetness to the cakes. Vanilla extract elevates the other ingredients, complementing the buttery notes of the cake without being overpowering.
-
Lemon Zest – 1 tablespoon (optional)
The zest of lemon adds a refreshing citrusy kick. It’s an optional ingredient in the recipe, but it gives the Queen Cakes a lovely zing, brightening up the sweetness of the batter. You can omit it for a more traditional flavor or experiment with other citrus zest.
-
Glacé Cherries – For decoration
Glacé cherries, often used to garnish these cakes, not only add a touch of color but also a slight, fruity sweetness that contrasts beautifully with the light texture of the sponge.
Equipment Needed
To prepare Mary Berry’s Queen Cakes, you’ll need a few essential tools to ensure your cakes turn out perfectly. Here’s the equipment required:
-
Mixing Bowl
A medium-sized mixing bowl will be your main tool for combining all the wet and dry ingredients. Make sure it’s large enough to comfortably mix everything without spilling.
-
Electric Hand Mixer (or Stand Mixer)
An electric hand mixer is ideal for creaming together the butter and sugar, and for beating the eggs into the mixture. If you prefer the old-fashioned method, a whisk will work, but an electric mixer will speed things up and ensure a smooth batter.
-
Spatula
A silicone or rubber spatula will help you scrape down the sides of the bowl and fold in ingredients gently. It’s a versatile tool for ensuring that no ingredients are left unmixed.
-
Cupcake Tin or Muffin Tray
For the traditional mini cakes, a standard 12-hole muffin tray works perfectly. This gives you even portions and helps the cakes bake uniformly. Make sure the tray is well-greased or lined with paper cupcake cases.
-
Paper Cases
Paper cupcake or muffin cases are essential to prevent the cakes from sticking to the tray. They also give the cakes a neat, tidy appearance, ideal for serving guests. You can choose white or colorful cases, depending on the occasion.
-
Cooling Rack
After the cakes have baked, a cooling rack is essential for allowing them to cool evenly. It prevents the bottom of the cakes from becoming soggy by allowing air to circulate around them.
-
Grater (for lemon zest)
If you decide to add lemon zest, you’ll need a fine grater to carefully remove the zest without getting any bitter pith. Just a light grating will do the trick to release the essential oils.
How To Make Mary Berry’s Queen Cakes
Creating Mary Berry’s Queen Cakes is a straightforward process, but it requires a little patience and attention to detail to get the perfect result. Follow these steps for flawless mini cakes:
1. Preheat The Oven And Prepare The Tray
Begin by preheating your oven to 180°C (350°F), or 160°C (320°F) for fan-assisted ovens. Line a 12-hole muffin tin with paper cupcake cases. Grease the tin lightly with butter if you’re not using paper cases.
2. Cream Butter And Sugar
In your mixing bowl, add the softened butter and caster sugar. Using an electric hand mixer, cream them together until the mixture is pale, fluffy, and smooth. This step is essential for incorporating air into the batter, which helps the cakes rise nicely in the oven.
3. Add Eggs And Mix
Beat the eggs in a separate bowl and gradually add them to the butter-sugar mixture, mixing as you go. Add the eggs one at a time, ensuring each egg is fully incorporated before adding the next.
This will help avoid curdling. If the mixture looks like it might curdle, add a spoonful of flour to help stabilize it.
4. Fold In Dry Ingredients
Sift the self-raising flour into the mixture, and gently fold it in using a spatula. Be careful not to overmix, as this can cause the cakes to be dense. Fold until just combined, ensuring there are no pockets of flour.
5. Add Milk, Vanilla, And Lemon Zest
Pour in the milk, vanilla extract, and lemon zest (if using). Stir gently to combine all the ingredients into a smooth, soft batter.
6. Spoon The Batter Into The Cases
Divide the batter evenly between the cupcake cases. A spoon or an ice cream scoop works well for portioning out the mixture. Fill each case about two-thirds full to give the cakes room to rise.
7. Bake The Queen Cakes
Place the muffin tin in the preheated oven and bake for 15-20 minutes, or until the cakes are golden brown on top and a skewer inserted into the center comes out clean. Keep an eye on them to prevent over-baking.
8. Cool And Decorate
Once baked, allow the cakes to cool in the tin for a few minutes before transferring them to a wire rack to cool completely. To decorate, top each cake with a glace cherry for that traditional finishing touch.
Expert Tips
-
Room Temperature Ingredients
Make sure your butter, eggs, and milk are all at room temperature before starting. This helps them combine more easily and evenly, resulting in a smoother batter and better-textured cakes.
-
Avoid Overmixing
Once you add the flour, be careful not to overmix the batter. Overworking the mixture can lead to dense, heavy cakes. Gently fold the flour in until it’s just incorporated.
-
Use Fresh Glacé Cherries
For decoration, use fresh, vibrant glacé cherries. If they’re too sticky, you can roll them in a little sugar to make them easier to handle and to add a touch of sparkle to the cakes.
-
Make-Ahead Option
These cakes can be made ahead of time and stored in an airtight container for a few days. For extra freshness, you can freeze the cakes without the cherries, and then add the cherries once defrosted.
-
Customization
Experiment with flavorings!
While lemon zest is traditional, you can also use orange zest, or add a dash of almond extract for a slightly different flavor profile.
Mary Berry’s Queen Cakes are a timeless British classic, offering a delicate balance of sweetness and lightness. With their buttery texture, light crumb, and beautiful glacé cherry topping, they’re sure to be a crowd-pleaser for any occasion, whether it’s a casual afternoon tea or a more formal gathering.
The ingredients are simple, the process is straightforward, and the results are nothing short of delightful. By following Mary Berry’s recipe, you’re guaranteed a batch of perfectly baked, beautifully golden cakes every time. And with a few expert tips, you’ll be able to tweak the recipe to your liking, making them uniquely yours.
Happy baking!
Easy Recipe Variations For Mary Berry’s Queen Cakes
Mary Berry’s Queen Cakes are a quintessential British treat – light, buttery, and perfectly sweet. While the classic recipe is delightful on its own, there are plenty of easy variations you can try to make the cakes your own or add a little extra flair. Let’s dive into some creative spins on the traditional Queen Cake.
-
Lemon And Poppy Seed Queen Cakes
Lemon is a vibrant addition that pairs beautifully with the light, fluffy texture of Queen Cakes. To incorporate lemon, simply add the zest of one lemon to the cake batter and a tablespoon of poppy seeds.
The poppy seeds provide a delightful crunch and texture that contrasts nicely with the softness of the cake. For an extra lemony zing, you could drizzle a simple lemon glaze (made from powdered sugar and lemon juice) over the top once the cakes are baked and cooled.
-
Raspberry And Almond Queen Cakes
A wonderful way to infuse more flavor into the cakes is by incorporating raspberries and almonds. Fold fresh or frozen raspberries into the batter along with a teaspoon of almond extract.
The raspberries add a juicy burst of tartness that balances the sweetness of the cake, while the almond extract deepens the flavor profile. For a decorative touch, sprinkle sliced almonds on top before baking, or pipe a little almond-flavored buttercream once the cakes are cool.
-
Chocolate Chip Queen Cakes
For chocolate lovers, chocolate chip Queen Cakes are an obvious go-to. Adding dark or milk chocolate chips to the batter is simple but transforms these little cakes into a decadent treat.
The rich pockets of melted chocolate within the light sponge create a heavenly combination. To elevate this variation, you can fold in a tablespoon of cocoa powder to enhance the chocolate flavor or top the cakes with a dusting of cocoa powder for a bit of sophistication.
-
Spiced Queen Cakes
For an autumnal twist, you can create spiced Queen Cakes by adding a blend of warming spices like cinnamon, nutmeg, and cloves. A teaspoon of cinnamon or mixed spice powder will give the cakes a cozy, aromatic flavor that’s perfect for cooler months. You could even throw in a handful of chopped dried fruit, such as sultanas or raisins, for a more traditional spiced cake flavor.
-
Coconut And Lime Queen Cakes
If you’re craving something tropical, coconut and lime Queen Cakes are a refreshing option. Stir in desiccated coconut and the zest of a lime into the batter, and once the cakes are baked, drizzle them with a tangy lime glaze.
The coconut adds a chewy texture, while the lime gives the cakes a zesty, fresh flavor. You can also sprinkle a little toasted coconut on top for added crunch and visual appeal.
-
Carrot And Walnut Queen Cakes
For a slight twist that’s more indulgent yet still light, try adding grated carrots and chopped walnuts. The carrots keep the cakes moist, while the walnuts provide an earthy crunch.
You can also include a little cinnamon or ginger in the batter to complement the flavors. A light cream cheese frosting on top will turn these cakes into a truly scrumptious treat.
These variations are all simple, yet they allow you to experiment and personalize the Queen Cakes to suit different tastes or occasions. Whether you’re in the mood for something fruity, nutty, or spiced, the versatility of the Queen Cake base means you can easily make it your own.
Best Practices To Store Leftovers
Queen Cakes are incredibly delicious when freshly baked, but sometimes there are leftovers – and that’s not necessarily a bad thing!
To ensure your leftover Queen Cakes stay as fresh and tasty as possible, following these best storage practices is key.
-
Allow Cakes To Cool Completely
Before storing your Queen Cakes, make sure they are completely cool. Storing cakes that are still warm can create condensation inside the storage container, leading to sogginess. Let them sit on a wire rack for at least 30 minutes to ensure they’ve cooled thoroughly.
-
Airtight Containers
To keep your Queen Cakes fresh, place them in an airtight container. This will help to maintain their moisture and prevent them from drying out. Ideally, use a container that fits the cakes snugly, so they’re not jostling around, which could lead to them becoming damaged or squashed.
-
Wrap Individually For Extended Freshness
If you have several cakes and want to ensure they stay as fresh as possible, wrap them individually in cling film before placing them in the airtight container. This adds an extra layer of protection and keeps each cake from losing moisture to the others.
-
Refrigeration
Although Queen Cakes are generally fine at room temperature for a couple of days, they will last longer if stored in the refrigerator, particularly if they contain any moist ingredients like fruit, cream cheese frosting, or buttercream. Just be sure to allow them to come to room temperature before serving, as cold cakes can lose some of their flavor and texture.
-
Freezing For Future Enjoyment
If you find yourself with more Queen Cakes than you can eat within a few days, freezing them is a great option. Wrap the cakes individually in plastic wrap, then place them in a freezer-safe bag or container.
Queen Cakes can last for up to three months in the freezer. To defrost, leave them at room temperature for a few hours, and they’ll be ready to enjoy once again.
-
Avoid Overstacking
If you have multiple cakes, avoid stacking them too high, especially if they’re topped with icing or decorations. The weight of the cakes on top can squash the ones beneath. If you need to stack them, consider placing a piece of parchment paper between each layer for protection.
By following these storage practices, you can keep your leftover Queen Cakes fresh, moist, and delicious for longer, giving you the pleasure of enjoying them over several days or weeks.
What Goes Well With Queen Cakes
While Queen Cakes are delightful on their own, pairing them with complementary accompaniments can elevate your tea time or dessert experience. The light, fluffy texture and subtle sweetness of the cakes make them versatile when it comes to pairing with other foods and drinks.
-
Tea
A classic choice for pairing with Queen Cakes is a nice cup of tea. Earl Grey, with its fragrant notes of bergamot, is an ideal match as its citrusy undertones complement the sweetness of the cakes. Alternatively, a smooth Darjeeling or a light Assam tea would work equally well, balancing the lightness of the cake without overwhelming its flavors.
-
Fresh Berries And Cream
Fresh berries, such as raspberries, strawberries, or blueberries, are a wonderful accompaniment to Queen Cakes. Their tartness contrasts beautifully with the sweetness of the cakes. Add a dollop of whipped cream or a drizzle of clotted cream, and you’ve got a deliciously balanced treat that feels indulgent yet refreshing.
-
Custard Or Clotted Cream
For those who enjoy a richer dessert experience, serving Queen Cakes with custard or clotted cream is a great option. The creamy, velvety textures add a luxurious layer to the light, airy cakes. If you want to give a nod to classic British desserts, this pairing is one that can’t be overlooked.
-
Jam And Butter
Queen Cakes can also be served simply with a spread of jam (strawberry or raspberry work beautifully) and a smear of butter. The jam provides an additional layer of fruitiness, while the butter adds richness and depth. This pairing is comforting and reminiscent of afternoon tea at a cozy café.
-
Ice Cream
For a more indulgent twist, serving Queen Cakes with a scoop of ice cream can be a real treat. Vanilla, honeycomb, or even a tangy lemon sorbet would complement the flavors of the cake nicely. The contrast of cold and warm is a delightful sensory experience that makes the Queen Cakes feel even more special.
-
Sparkling Wine Or Champagne
For a celebratory touch, Queen Cakes can pair beautifully with a glass of bubbly. A dry sparkling wine or Champagne works wonderfully, as the effervescence helps cleanse the palate between bites, making it a perfect pairing for a sweet treat.
Conclusion
Mary Berry’s Queen Cakes are a classic, light dessert that’s both versatile and delicious. Whether you stick to the original recipe or experiment with different flavor variations, you’re bound to create something that’s delightful.
Storing leftovers properly ensures you can enjoy them for days to come, and pairing them with the right drinks or accompaniments elevates the experience to a whole new level. Whether enjoyed on their own, with a cup of tea, or alongside something indulgent like ice cream, Queen Cakes are a treat for any occasion. Their versatility makes them an ideal option for gatherings, celebrations, or simply as a comforting homemade treat.
FAQs
What Are Mary Berry’s Queen Cakes?
Mary Berry’s Queen Cakes are light, fluffy, and delicious small sponge cakes typically baked in individual cupcake or fairy cake-sized portions. They are traditionally topped with a simple icing and sometimes decorated with a cherry, making them a popular British teatime treat.
What Ingredients Are Needed For Mary Berry’s Queen Cakes?
The basic ingredients for Mary Berry’s Queen Cakes include self-raising flour, caster sugar, butter, eggs, and a little milk. For the icing, you will need icing sugar, a bit of water or lemon juice, and optional decorations like cherries or sprinkles.
How Long Do You Bake Mary Berry’s Queen Cakes?
Mary Berry’s Queen Cakes typically bake for about 15-20 minutes at 180°C (160°C fan) or 350°F. However, baking times may vary slightly depending on your oven, so it’s best to check with a skewer; if it comes out clean, they are ready.
Can I Use Plain Flour Instead Of Self-raising Flour For Queen Cakes?
You can use plain flour instead of self-raising flour, but you will need to add a raising agent, such as baking powder, to achieve the same rise. For every 100g of plain flour, add about 1½ teaspoons of baking powder.
Can I Make Mary Berry’s Queen Cakes Without Eggs?
Yes, you can make egg-free versions of Queen Cakes. You can replace eggs with alternatives like unsweetened applesauce, a flaxseed mixture (1 tbsp flaxseed meal + 3 tbsp water per egg), or commercial egg replacers.
What Can I Use Instead Of Butter In Mary Berry’s Queen Cakes?
If you prefer not to use butter, you can substitute it with margarine, vegetable oil, or a dairy-free spread. However, using butter provides a richer flavor and texture.
How Do I Decorate Mary Berry’s Queen Cakes?
Mary Berry’s Queen Cakes are traditionally decorated with a simple icing made from icing sugar and a little water or lemon juice. You can also top them with a cherry, sprinkles, or edible flowers for a more festive look.
Can I Freeze Mary Berry’s Queen Cakes?
Yes, Mary Berry’s Queen Cakes freeze well. Allow them to cool completely, then wrap them tightly in plastic wrap or foil and store in an airtight container or freezer bag. They can be frozen for up to 3 months.
Can I Make Mary Berry’s Queen Cakes In Advance?
Yes, you can make Queen Cakes a day or two in advance. Once baked, store them in an airtight container at room temperature. Decorate with icing or toppings just before serving to maintain freshness.
Why Are My Queen Cakes Too Dense Or Heavy?
If your Queen Cakes turn out dense, it could be due to overmixing the batter, which can cause the cake to lose air. Be sure to mix the ingredients gently and not for too long. Also, check your raising agents (baking powder or self-raising flour) are fresh.
![Mary Berry Ginger Bread Recipe [Tips & Tricks]](https://famousyummyrecipes.com/wp-content/uploads/2025/03/ginger-bread.jpg)
![Mary Berry Spiced Red Cabbage Recipe [Tips & Tricks]](https://famousyummyrecipes.com/wp-content/uploads/2025/03/spiced-red-cabbage.jpg)
![Mary Berry Irish Soda Bread Recipe [Tips & Tricks]](https://famousyummyrecipes.com/wp-content/uploads/2025/03/irish-soda-bread.jpg)
![Mary Berry Saturday Night Pasta Recipe [Tips & Tricks]](https://famousyummyrecipes.com/wp-content/uploads/2025/03/saturday-night-pasta.jpg)
![Mary Berry Blackberry And Apple Crumble Recipe [Tips & Tricks]](https://famousyummyrecipes.com/wp-content/uploads/2025/03/blackberry-and-apple-crumble.jpg)
![Mary Berry Plum Crumble Recipe [Tips & Tricks]](https://famousyummyrecipes.com/wp-content/uploads/2025/03/plum-crumble.jpg)