
Mary Berry Celebration Chocolate Mousse Cake Recipe [Tips & Tricks]
Note: This page contains affiliate links.
As an Amazon Associate, I earn from qualifying purchases when you click on the link, but you are not charged extra.
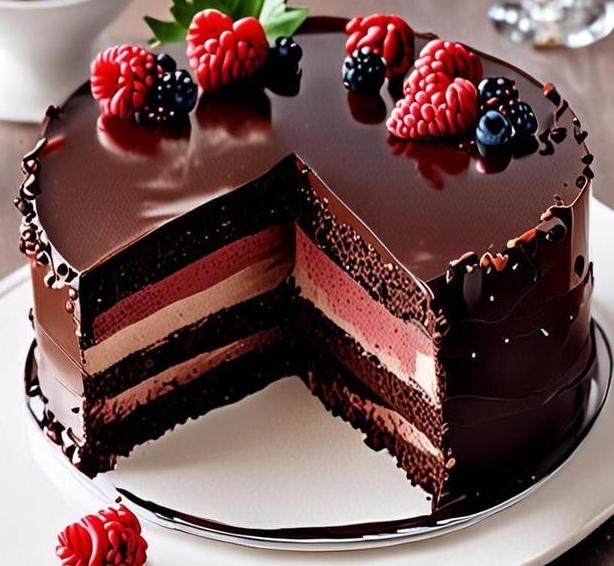
If you’re looking for a show-stopping dessert that will impress everyone, then Mary Berry’s Celebration Chocolate Mousse Cake is definitely worth trying!
This cake brings together the best of both worlds – a rich, velvety chocolate mousse paired with a soft, decadent cake base. It’s the perfect treat for any special occasion or simply a sweet indulgence when you’re craving something luxurious. With Mary Berry’s trusted expertise, this recipe ensures you’ll be able to create a truly memorable dessert that will have your guests coming back for seconds (or thirds!)
Mary Berry Celebration Chocolate Mousse Cake Recipe
Ingredients Needed
To create Mary Berry’s Celebration Chocolate Mousse Cake, you’ll need a selection of ingredients that come together beautifully to create a rich, decadent dessert. The ingredients are divided into two parts: the base (which includes the cake layer) and the mousse topping. Here’s a breakdown:
For The Cake
- Butter – Use unsalted butter at room temperature to create a smooth batter and a moist cake.
- Caster Sugar – This finer sugar helps in creating a smooth texture for the cake and ensures it rises well.
- Eggs – Large eggs, room temperature, provide structure and stability to the cake.
- Plain Flour – The backbone of the cake’s structure. Make sure you sift it before adding to avoid clumping and ensure an even texture.
- Cocoa Powder – This is key to giving the cake its deep, chocolatey flavor. Opt for a high-quality cocoa powder for the best taste.
- Baking Powder – A leavening agent that helps the cake rise and stay light.
- Milk – Whole milk is best here, as it adds moisture to the cake without making it too rich or too light.
For The Mousse
- Dark Chocolate – The star of the mousse. A high-quality, 70% cocoa dark chocolate brings richness and depth of flavor to the dessert.
- Double Cream – This will give the mousse its silky, smooth texture, creating that luxurious mouthfeel.
- Caster Sugar – A small amount is added to balance the bitterness of the dark chocolate.
- Egg Whites – These are whipped to soft peaks and folded into the chocolate mixture to give the mousse its airy and light texture.
- Vanilla Extract – A little splash of vanilla enhances the chocolate’s flavor, adding complexity.
These ingredients are fairly simple but come together to create something extraordinary. The richness of the dark chocolate mousse complements the slightly lighter, cocoa-flavored cake base perfectly.
Equipment Needed
To ensure you can make Mary Berry’s Celebration Chocolate Mousse Cake with ease, here’s a list of the essential equipment you’ll need. Each piece plays a crucial role in bringing the recipe to life:
- Cake Tin (Round, 8-9 inches) – A good-quality round cake tin is essential for baking the base. A non-stick tin with a loose base will make it much easier to remove the cake after baking.
- Mixing Bowls – Large and medium mixing bowls will be necessary for preparing the cake batter, the chocolate mousse, and for whipping the egg whites.
- Electric Mixer – While you can use a hand whisk for whipping the egg whites and cream, an electric mixer will make this process faster and more efficient. This is especially helpful when you’re whipping egg whites to stiff peaks.
- Sifter – A fine mesh sifter will be useful for sifting the flour and cocoa powder together to ensure there are no lumps in the dry ingredients, and that everything combines smoothly.
- Spatula – A flexible silicone spatula is perfect for folding in delicate ingredients like egg whites into the mousse mixture without deflating them.
- Saucepan – You’ll need a small saucepan for gently melting the chocolate with a little cream to make the mousse base.
- Piping Bag (optional) – For an elegant touch, you might want to pipe the mousse onto the top of the cake, though this is entirely optional.
- Cooling Rack – It’s essential to allow the cake to cool completely before layering the mousse on top. A cooling rack helps air circulate around the cake, cooling it evenly and quickly.
Having these tools will set you up for success in making this cake. They’re all quite standard and should be in most home kitchens, but it’s always good to check beforehand.
How To Make Mary Berry’s Celebration Chocolate Mousse Cake
Now let’s break down how to actually make this stunning cake, step by step:
Step 1: Bake The Cake Base
- Prepare the oven: Preheat your oven to 180°C (160°C for fan-assisted ovens) or 350°F.
- Grease and line the cake tin: Use a round 8-inch or 9-inch cake tin. Grease the tin and line it with parchment paper to ensure the cake doesn’t stick.
- Mix the dry ingredients: In a bowl, sift the plain flour, cocoa powder, and baking powder together.
- Cream the butter and sugar: In another bowl, beat the unsalted butter and caster sugar together until light and fluffy.
- Add eggs: Add the eggs one at a time, beating well after each addition to ensure the mixture is smooth and combined.
- Add dry ingredients and milk: Gradually add the sifted dry ingredients, alternating with the milk. Mix gently until smooth.
- Bake the cake: Pour the batter into the prepared tin and smooth the top with a spatula. Bake in the preheated oven for around 20-25 minutes or until a skewer comes out clean. Once baked, remove from the oven and allow it to cool completely on a wire rack.
Step 2: Prepare The Chocolate Mousse
- Melt the chocolate: In a small saucepan, heat the dark chocolate and double cream over low heat until melted and smooth. Stir constantly to avoid burning the chocolate.
- Whip the cream: In a separate bowl, whip the double cream until soft peaks form.
- Whip the egg whites: In another clean bowl, whisk the egg whites until soft peaks form.
- Fold the chocolate mixture into the whipped cream: Carefully fold the cooled chocolate-cream mixture into the whipped cream until well combined.
- Fold in the egg whites: Gently fold the whipped egg whites into the chocolate-cream mixture. Do this slowly and carefully to maintain the mousse’s light, airy texture.
Step 3: Assemble The Cake
- Cut the cake: Once the cake has cooled, carefully slice it in half horizontally to create two layers.
- Layer the mousse: Place the bottom half of the cake back into the tin or a serving plate. Spread a generous layer of the mousse over the cake.
- Top with the second layer of cake: Place the second layer of cake on top and press down lightly to make sure it’s even.
- Top with more mousse: Spoon the remaining mousse over the top of the cake, smoothing it out to cover the entire surface.
- Chill: Refrigerate the cake for at least 4 hours or until the mousse has set and firmed up.
Step 4: Serve And Enjoy
Once chilled and set, remove the cake from the tin, slice it, and enjoy the decadent layers of rich chocolate cake and airy mousse!
Expert Tips
To elevate your chocolate mousse cake to the next level, here are a few expert tips:
- Use high-quality chocolate: The chocolate you use in the mousse will directly impact the flavor of the cake, so choose a premium dark chocolate with around 70% cocoa for a rich, sophisticated taste.
- Ensure the egg whites are properly whipped: The key to a fluffy mousse is the proper whipping of the egg whites. They need to be whipped to stiff peaks, so they hold their shape but don’t dry out.
- Chill the mousse long enough: Don’t rush the chilling process. Allowing the mousse to set in the fridge is essential for the cake to hold together and for the flavors to develop.
- Decorate creatively: For extra flair, consider adding chocolate shavings, a dusting of cocoa powder, or even fresh berries on top of the mousse before serving.
- Don’t overbake the cake: The cake layer should remain moist, so be sure to check it early and often. Overbaking will make it dry.
Mary Berry’s Celebration Chocolate Mousse Cake is the epitome of indulgence, combining a rich chocolate cake with a light and velvety mousse that will have anyone who tries it asking for seconds. The balance between the cake’s slightly dense, cocoa-rich base and the mousse’s airy, creamy texture is what makes this cake a showstopper.
Whether you’re celebrating a special occasion or simply treating yourself, this cake is a guaranteed crowd-pleaser. By following these detailed steps and expert tips, you’ll be able to make a stunning, professional-looking cake that’s both impressive and delicious.
Easy Recipe Variations For Mary Berry’s Celebration Chocolate Mousse Cake
Mary Berry’s Celebration Chocolate Mousse Cake is already a spectacular dessert that combines the richness of chocolate with the airiness of mousse and the depth of a well-baked sponge. However, there are numerous easy variations to this iconic recipe that can help you personalize it based on your preferences, dietary restrictions, or to match a specific occasion. Let’s explore a few delightful options:
1. Fruit-infused Mousse Layer
For a fresh twist, you can infuse the mousse layer with fruit flavors. One simple approach is to add fruit purée, like raspberry or orange, to the chocolate mousse base.
Puree the fruit, strain it to remove any seeds, and gently fold it into the chocolate mixture. This will not only introduce a refreshing contrast to the richness of the chocolate but also add a vibrant color to your cake.
2. Nutty Chocolate Base
For those who love a bit of crunch, adding a layer of chopped nuts (such as hazelnuts, almonds, or pistachios) to the chocolate base can elevate both the flavor and texture of the cake. Simply toast the nuts lightly to enhance their flavor and sprinkle them evenly over the base layer before adding the mousse. This variation can add a sophisticated edge and an earthy contrast to the smoothness of the mousse.
3. Caramel Drizzle
If you prefer a sweeter, more indulgent version, a caramel drizzle or sauce can be added on top of the mousse layer. To make your own caramel sauce, melt sugar over medium heat until it turns golden brown, then stir in cream and butter.
Let it cool slightly before pouring it over the cake. The richness of the caramel combined with the chocolate mousse will make for an irresistible dessert.
4. Gluten-Free Version
For those avoiding gluten, you can modify the base to be gluten-free without compromising on flavor. Instead of the traditional flour, use ground almonds or a gluten-free flour blend. You can also ensure that your chocolate mousse recipe does not contain any gluten by checking the ingredients in your chocolate and other components.
5. Vegan Celebration Chocolate Mousse Cake
For a plant-based version, substitute the eggs and cream in the mousse with aquafaba (the liquid from a can of chickpeas) and coconut cream. Aquafaba can be whipped into stiff peaks just like egg whites, creating the mousse’s airy texture. Swap out butter for coconut oil in the base and use dairy-free chocolate to keep the recipe fully vegan while maintaining that rich, indulgent flavor.
6. Spiced Chocolate Mousse
For an extra layer of complexity, you can spice up your chocolate mousse with a touch of warmth. Consider adding a pinch of cinnamon, nutmeg, or even chili powder to the mousse mixture.
This gives the cake a more exotic flavor profile that can really surprise your taste buds. The warmth of the spices will complement the sweetness of the mousse and provide an intriguing contrast to the richness of the chocolate.
Best Practices To Store Leftovers
Storing leftovers from Mary Berry’s Celebration Chocolate Mousse Cake properly ensures that it stays fresh and delicious for days after your celebration. Here are the best practices for storing and extending the life of your chocolate mousse cake:
1. Refrigerate Promptly
Chocolate mousse, particularly the whipped layers, can soften and lose its structure if left at room temperature for too long. After serving, cover the cake with plastic wrap or place it in an airtight container and refrigerate it immediately. The cool environment will help maintain its texture and prevent any rapid spoilage.
2. Cover The Cake Properly
To avoid the mousse from absorbing any unwanted flavors from the fridge, be sure to cover the cake securely. You can use a cake dome or place it in a large, airtight container. If you’re using plastic wrap, ensure it is wrapped snugly to prevent air from getting in.
3. Separate Layers When Storing (If Possible)
If you’ve made a version with several layers or complex elements like caramel or fruit-infused mousse, it might be wise to store each component separately. This will allow the mousse and cake layers to stay at their optimal texture and flavor without becoming soggy or dried out.
4. Freeze For Long-Term Storage
If you need to store the cake for an extended period, freezing is your best option. Slice the cake into individual portions and place them on a tray in the freezer until solid.
Then, wrap each slice in plastic wrap and store them in a freezer-safe bag. The cake can last in the freezer for up to two months. To defrost, simply place the slices in the fridge overnight, and they will retain most of their original texture.
5. Avoid Freezing The Mousse
While the base of the cake can freeze well, the mousse layer doesn’t hold up to freezing as well due to its delicate structure. Freezing can cause the mousse to lose its smooth, airy consistency once thawed. It’s best to freeze only the cake layer if you’re looking to store portions for later.
What Goes Well With Celebration Chocolate Mousse Cake
The rich, indulgent nature of Mary Berry’s Celebration Chocolate Mousse Cake makes it a showstopper on its own. However, there are several delicious accompaniments that can complement and balance its decadent flavors:
1. Fresh Berries
Fresh berries-such as raspberries, strawberries, or blackberries-offer a burst of tartness that contrasts beautifully with the sweetness and richness of the chocolate mousse. The light acidity of the berries helps to cleanse the palate between bites and enhances the overall flavor profile.
2. Whipped Cream
A dollop of freshly whipped cream, lightly sweetened or flavored with vanilla, pairs perfectly with the mousse cake. The cream’s airy texture provides a wonderful contrast to the richness of the chocolate, making each bite more luxurious.
3. Coffee Or Espresso
A warm cup of coffee or a shot of espresso serves as an excellent pairing for this cake. The slightly bitter notes of coffee complement the sweetness of the chocolate, creating a harmonious balance. If you’re serving the cake at a party, consider offering coffee as part of the beverage options to elevate the dessert experience.
4. Chocolate Shavings Or Cocoa Powder
For those who want to enhance the cake’s appearance and deepen its chocolate flavor, a sprinkle of finely grated chocolate or a dusting of cocoa powder on top of the mousse works wonderfully. It adds both texture and an extra layer of chocolate indulgence.
5. Ice Cream
For a more indulgent experience, serve slices of the cake with a scoop of vanilla or hazelnut ice cream. The cold, creamy texture of the ice cream pairs wonderfully with the mousse, creating a delightful contrast in temperature and texture.
Conclusion
Mary Berry’s Celebration Chocolate Mousse Cake is a show-stopping dessert that, while rich and indulgent, offers endless opportunities for variation. Whether you choose to infuse the mousse with fruit, spice it up, or even go gluten-free or vegan, you can tailor this classic to fit your taste.
Properly storing leftovers ensures you can savor the cake days after the initial celebration, and with the right pairings-such as fresh berries, whipped cream, or a strong coffee-you can elevate the experience even further. Whether it’s a birthday, an anniversary, or any special occasion, this cake remains a timeless and versatile option that can be enjoyed in numerous ways.
FAQs
What Ingredients Are Needed For Mary Berry’s Celebration Chocolate Mousse Cake?
For the Celebration Chocolate Mousse Cake, you will need ingredients like dark chocolate, butter, eggs, caster sugar, double cream, and a few optional additions like vanilla extract and a pinch of salt. The cake base requires flour, cocoa powder, and baking powder.
Can I Make Mary Berry’s Celebration Chocolate Mousse Cake Ahead Of Time?
Yes, you can make this cake in advance. It’s ideal to prepare the cake and mousse separately and assemble it on the day you plan to serve it. The mousse will set in the fridge, and the cake can be kept at room temperature for a couple of days or stored in the fridge.
How Long Does It Take To Make Mary Berry’s Celebration Chocolate Mousse Cake?
The total time for making Mary Berry’s Celebration Chocolate Mousse Cake is about 2 to 2.5 hours.
This includes preparation, baking, and the chilling time for the mousse. However, you should allow an additional 4 hours or more for the mousse to fully set before serving.
Can I Use Milk Chocolate Instead Of Dark Chocolate For The Mousse?
While dark chocolate is recommended for its richness and depth of flavor, you can use milk chocolate if you prefer a sweeter, milder taste. However, the texture and overall flavor may vary slightly.
What Size Of Cake Tin Should I Use For Mary Berry’s Celebration Chocolate Mousse Cake?
Mary Berry’s recipe typically calls for an 8-inch (20 cm) round cake tin. If you’re using a different size tin, the baking time may need adjustment, as a larger tin will require less baking time, while a smaller tin may need a little more.
How Can I Make Sure The Chocolate Mousse Sets Properly?
To ensure the mousse sets properly, it’s important to let it chill in the fridge for at least 4 hours or overnight. The mousse should be thickened but still smooth. Also, ensure that the cream is whipped to soft peaks, not stiff, as this affects the texture.
Can I Make This Recipe Gluten-free?
Yes, Mary Berry’s Celebration Chocolate Mousse Cake can be made gluten-free by substituting the flour with a gluten-free flour blend. Make sure all other ingredients, such as baking powder and chocolate, are gluten-free as well.
Can I Decorate Mary Berry’s Celebration Chocolate Mousse Cake?
Absolutely!
You can decorate this cake with whipped cream, chocolate shavings, or fresh berries. For a festive touch, add edible gold leaf or a dusting of cocoa powder or powdered sugar.
What Should I Do If My Mousse Is Too Runny?
If the mousse turns out too runny, it could be due to under-whipping the cream or over-heating the melted chocolate. Try chilling the mousse for a longer time, or if it still doesn’t set, you can fold in a little extra whipped cream to help stabilize it.
Can I Freeze Mary Berry’s Celebration Chocolate Mousse Cake?
While the mousse part of the cake can be frozen for up to a month, it’s not ideal to freeze the entire cake as the texture may change upon thawing. If you do freeze it, it’s best to store the mousse separately from the cake and assemble it once thawed.
![Mary Berry Tiramisu Red Fruit Trifle Recipe [Tips & Tricks]](https://famousyummyrecipes.com/wp-content/uploads/2025/03/tiramisu-red-fruit-trifle.jpg)
![Mary Berry Blackened Salmon Recipe [Tips & Tricks]](https://famousyummyrecipes.com/wp-content/uploads/2025/03/blackened-salmon.jpg)
![Mary Berry Fast Gooseberry Fool Recipe [Tips & Tricks]](https://famousyummyrecipes.com/wp-content/uploads/2025/03/fast-gooseberry-fool.jpg)
![Mary Berry Chilled Curried Apple And Mint Soup Recipe [Tips & Tricks]](https://famousyummyrecipes.com/wp-content/uploads/2025/03/chilled-curried-apple-and-mint-soup.jpg)
![Mary Berry Jerusalem Artichoke And Celery Soup Recipe [Tips & Tricks]](https://famousyummyrecipes.com/wp-content/uploads/2025/03/jerusalem-artichoke-and-celery-soup.jpg)
![Mary Berry Lemon Cupcakes Recipe [Tips & Tricks]](https://famousyummyrecipes.com/wp-content/uploads/2025/03/lemon-cupcakes.jpg)