
Mary Berry Chocolate Fudge Icing Recipe [Tips & Tricks]
Note: This page contains affiliate links.
As an Amazon Associate, I earn from qualifying purchases when you click on the link, but you are not charged extra.
If you’re a fan of rich, indulgent chocolate flavors, then Mary Berry’s chocolate fudge icing recipe is something you absolutely need to try!
This recipe delivers the perfect balance of creamy, velvety chocolate that will take your cakes, cupcakes, and even brownies to the next level. It’s super simple to make, with just a few ingredients, yet the result is incredibly decadent. Plus, it’s Mary Berry – the queen of British baking – so you know you’re in for a treat that’s tried, tested, and guaranteed to impress your taste buds. Whether you’re baking for a special occasion or just treating yourself, this icing will make your desserts stand out in the most delicious way!
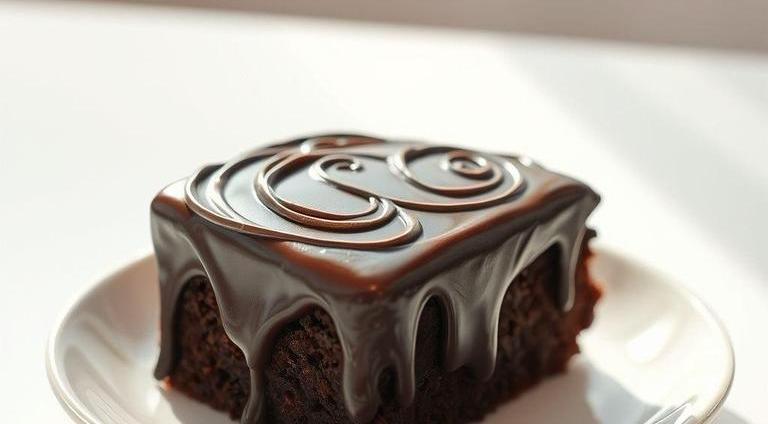
Mary Berry Chocolate Fudge Icing Recipe
Ingredients Needed
To create Mary Berry’s Chocolate Fudge Icing, you’ll need a few simple yet essential ingredients that come together to create a rich, smooth, and velvety finish to any cake. Here’s a breakdown of what you’ll need:
-
Dark Chocolate (200g): The star of the icing, dark chocolate brings a deep, rich flavor and a glossy finish to the icing. Using high-quality dark chocolate, ideally around 70% cocoa, will yield the best results, as it offers a balanced sweetness and bitterness.
-
Butter (100g): Unsalted butter provides a smooth texture and adds to the richness of the fudge. It helps in achieving the soft, creamy consistency of the icing, and without it, the chocolate wouldn’t melt and emulsify as perfectly.
-
Golden Syrup (2 tablespoons): Golden syrup, a thick, amber-colored sugar syrup, adds a subtle sweetness and also gives the icing a smooth, luxurious texture. If you don’t have golden syrup, you can substitute it with light corn syrup, though the flavor may differ slightly.
-
Icing Sugar (250g): The icing sugar is crucial for giving the fudge icing its smooth, velvety consistency. It dissolves seamlessly into the melted chocolate and butter mixture, helping to set the icing perfectly on the cake.
-
Milk (2-3 tablespoons): A small amount of milk helps in thinning the mixture slightly, making it easier to spread or drizzle over cakes. Adjust the amount to achieve the desired consistency – more milk will result in a thinner, pourable icing, while less will make it thicker.
These ingredients work in harmony to create a rich, glossy chocolate fudge icing that complements cakes, cupcakes, or even biscuits. Each ingredient plays a key role in achieving that perfectly smooth and decadent finish that Mary Berry’s recipe is known for.
Equipment Needed
To prepare this rich, luxurious chocolate fudge icing, you don’t need an extensive array of equipment. However, a few key tools will make the process smoother and more efficient:
-
A Heatproof Bowl: A large heatproof bowl will be essential for melting your chocolate and combining the ingredients. You’ll need this bowl to hold the chocolate, butter, and golden syrup while melting them together.
-
A Saucepan: The saucepan will be used to heat the water (for the bain-marie method, which involves gently melting the ingredients over simmering water). This is the safest way to melt chocolate, preventing it from burning and ensuring it melts evenly.
-
A Spatula or Wooden Spoon: A spatula or spoon is essential for stirring and mixing the chocolate and butter, ensuring everything is thoroughly combined. You’ll use this tool to stir the icing as it cools to the desired consistency.
-
Sifter: A sifter is useful for sifting the icing sugar into the mixture. This ensures there are no lumps and helps the sugar blend smoothly into the chocolate mixture, creating that smooth texture that is characteristic of fudge icing.
-
Measuring Spoons and Scales: Precision is key when it comes to baking, so measuring spoons and scales will help ensure you’re using the correct amounts of each ingredient. This is especially important when working with ingredients like golden syrup or milk.
-
A Palette Knife or Offset Spatula: Once your icing has reached the perfect consistency, a palette knife or offset spatula will help spread the icing evenly across the cake or cupcakes. This tool allows for a smooth and even application without disturbing the cake’s surface.
How To Make Mary Berry’s Chocolate Fudge Icing

Making Mary Berry’s Chocolate Fudge Icing is a straightforward process, but it requires patience and care to achieve that glossy, fudge-like finish. Here’s how to do it:
-
Melt the Chocolate and Butter: Begin by breaking the dark chocolate into pieces and placing it into a heatproof bowl. Add the butter and golden syrup to the same bowl. Set the bowl over a saucepan of simmering water (bain-marie method). Stir occasionally until the chocolate and butter are fully melted and combined, creating a smooth, glossy mixture.
-
Sift the Icing Sugar: While the chocolate mixture is cooling slightly, sift the icing sugar into a separate bowl. This ensures that the sugar is free from any lumps and will blend seamlessly into the melted chocolate mixture.
-
Combine the Mixtures: Gradually sift the icing sugar into the melted chocolate and butter mixture, stirring constantly. Add a couple of tablespoons of milk at this stage, adjusting the quantity to achieve the desired consistency. Keep stirring until the icing is smooth and glossy. You want the mixture to be thick but spreadable, so adjust the milk as needed to get that perfect texture.
-
Cool the Icing: Once the icing has been mixed to the right consistency, let it cool slightly. This will help thicken it a bit further and make it easier to spread or pipe onto your cake.
-
Apply the Icing: Once your cake has cooled completely (if you’re icing a cake), you can spread the fudge icing generously over the top. Use a palette knife to smooth it out or allow it to drip down the sides for a more dramatic effect. If you’re using it on cupcakes, you can pipe the icing onto each one for a neat and uniform finish.
-
Let It Set: Allow the icing to set for a while before serving the cake. The fudge icing will firm up a bit as it cools, giving you that lovely, fudgy texture with a glossy sheen.
Expert Tips
While Mary Berry’s Chocolate Fudge Icing is quite easy to make, there are a few expert tips that can take your icing from good to great:
-
Use High-Quality Chocolate: The quality of the chocolate plays a crucial role in the flavor of your icing. Opt for good-quality dark chocolate with a cocoa content of around 70%. The better the chocolate, the better the icing will taste.
-
Avoid Overheating the Chocolate: When melting the chocolate, ensure that the heat is gentle and that the chocolate is not exposed to direct heat. Overheating chocolate can cause it to seize, resulting in a grainy texture. The bain-marie method is perfect for keeping the chocolate at a steady, safe temperature.
-
Consistency Is Key: The consistency of the icing can make or break the finish. If it’s too thick, add a little more milk, and if it’s too runny, sift in a bit more icing sugar. It should be spreadable but thick enough to hold its shape on the cake.
-
Let the Cake Cool Completely Before Icing: Always ensure that the cake is fully cooled before applying the icing. If the cake is too warm, the icing can melt and slide off, leaving you with a less-than-perfect finish.
-
Chill the Icing: If you want to create a more structured, clean finish, place your iced cake in the fridge for a short time to allow the icing to firm up. This works particularly well for making smooth, polished finishes for birthday cakes or special occasions.
Mary Berry’s Chocolate Fudge Icing is a wonderfully decadent and easy-to-make recipe that can elevate any cake. The rich, glossy finish and smooth, velvety texture of the icing complement a wide range of baked goods, from classic sponges to indulgent brownies. With just a handful of ingredients and a few simple steps, you can create a luscious, homemade icing that adds both flavor and style to your baking.
By following the expert tips and keeping an eye on the consistency, you can perfect your chocolate fudge icing every time. Whether you’re a seasoned baker or a beginner, this recipe will undoubtedly impress. It’s a classic that never goes out of style and will undoubtedly become a go-to for all your future baking endeavors.
Easy Recipe Variations For Mary Berry’s Chocolate Fudge Icing
Mary Berry’s Chocolate Fudge Icing is already a decadent treat, but with a few easy modifications, you can elevate it further to create variations that match your preferences or the theme of your dessert. Here are a few creative ways to play with this icing recipe and make it your own:
1. Salted Caramel Chocolate Fudge Icing
Adding a salty-sweet twist to the smooth richness of the chocolate fudge icing can make it even more irresistible. Simply stir in a couple of tablespoons of high-quality caramel sauce into the icing mix, and finish with a pinch of flaky sea salt on top. The sweetness of the chocolate balances perfectly with the saltiness of the caramel, creating an indulgent flavor profile.
2. Mint Chocolate Fudge Icing
For those who love the refreshing combination of mint and chocolate, this variation will be a hit. Add a few drops of peppermint extract (start with a small amount as mint extract can be strong!) to the icing mixture. The fresh, cool mint flavor paired with the fudgy chocolate creates a delicious contrast that works beautifully on chocolate cakes, cupcakes, or brownies.
3. Espresso Chocolate Fudge Icing
Enhance the depth of flavor in your chocolate fudge icing with a coffee kick. Dissolve a teaspoon of instant coffee or espresso powder in hot water, then add it to the icing as it comes together.
The coffee brings out the richness of the chocolate, creating a more complex and sophisticated flavor profile. This variation works especially well with chocolate cakes or cakes that are rich and dense, like a flourless chocolate cake.
4. Orange Chocolate Fudge Icing
For those who love the bright, zesty flavor of citrus, adding orange zest to the icing provides a perfect balance with the dark chocolate’s richness. A tablespoon of freshly grated orange zest and a teaspoon of orange juice can be folded into the icing for a fruity and aromatic variation. This works particularly well with cakes that feature berries or a spongy vanilla base, creating a refreshing citrus-chocolate experience.
5. Nutty Chocolate Fudge Icing
To add a bit of crunch and extra richness, you can stir in finely chopped nuts like hazelnuts, almonds, or walnuts. Toast the nuts lightly before mixing them into the icing to enhance their flavor and texture. This adds not just flavor, but also a bit of dimension to the smoothness of the chocolate fudge icing.
These easy variations can elevate the flavor profile of Mary Berry’s already mouthwatering chocolate fudge icing, making it more customizable and exciting for different occasions and personal tastes. Whether you’re making a birthday cake, brownies, or cupcakes, these simple adjustments ensure your dessert stands out.
Best Practices To Store Leftovers
Chocolate fudge icing is a luxurious treat that often yields more than what you need for your current project. Storing leftovers properly is essential to maintaining its creamy texture and rich flavor. Here are some best practices to ensure your icing stays fresh and usable for a future baking endeavor:
1. Allow It to Cool Completely
Before storing any leftover chocolate fudge icing, make sure it has cooled to room temperature. Storing it while it’s still warm can cause condensation to form inside the container, leading to moisture issues and potential separation of the ingredients.
2. Store in an Airtight Container
The key to keeping your fudge icing fresh is to seal it tightly. Use an airtight container that will prevent air from getting in, which could dry out the icing or cause it to harden. Glass jars with secure lids or plastic containers with tight-fitting seals are ideal.
3. Refrigerate Leftovers
To extend the shelf life of your chocolate fudge icing, store it in the fridge. When stored properly in the refrigerator, it can last for up to a week. The cool temperature helps preserve its freshness and prevents any bacteria from developing.
4. Reheat Before Use
If you want to reuse your stored chocolate fudge icing, allow it to come to room temperature or gently reheat it. Do this by microwaving it in short bursts (around 10-15 seconds) and stirring in between, or by placing the container in a bowl of warm water to soften it up. Avoid overheating, as this can cause the chocolate to seize or separate from the fat in the mixture.
5. Freezing for Long-Term Storage
If you have a large batch of leftover icing, consider freezing it for later use. Portion the icing into smaller amounts, then wrap it tightly in plastic wrap or place it in freezer-safe containers.
Label the container with the date so you can easily track how long it has been stored. Chocolate fudge icing can be frozen for up to three months. When ready to use, thaw it in the fridge overnight and follow the reheating instructions above to restore its smooth consistency.
Proper storage ensures that your chocolate fudge icing remains just as delicious for your next baking project as it did when it was freshly made.
What Goes Well With Chocolate Fudge Icing
Chocolate fudge icing is rich and indulgent, making it a perfect topping or filling for a wide range of desserts. The smooth, velvety texture and deep chocolate flavor pair beautifully with various cakes, pastries, and even non-cake items. Here’s a look at some of the best desserts and dishes that complement chocolate fudge icing:
1. Rich Chocolate Cakes
The classic pairing for chocolate fudge icing is, of course, chocolate cake. Whether it’s a simple chocolate sponge or a decadent layered cake, the chocolate fudge icing creates a luscious coating that enhances the chocolate flavor. Consider adding extra layers of chocolate ganache or fillings like chocolate mousse for an even richer dessert.
2. Vanilla or Almond Cakes
While chocolate pairs naturally with chocolate, the rich sweetness of chocolate fudge icing also works wonderfully with lighter cakes. A moist vanilla or almond-flavored cake offers a perfect contrast to the richness of the fudge icing. The smoothness of the icing balances the subtle sweetness of the cake, making it a harmonious dessert.
3. Cupcakes
For an easy-to-serve treat, chocolate fudge icing is excellent for topping cupcakes. Chocolate cupcakes topped with chocolate fudge icing create a perfect balance of flavor, but you could also pair it with vanilla cupcakes for a more subtle contrast. Garnishing with sprinkles, edible gold dust, or a few chocolate shavings adds flair and elegance.
4. Brownies
Chocolate fudge icing takes brownies to the next level by adding another layer of richness and sweetness. The fudge icing works perfectly on both classic fudgy brownies and slightly cakier versions, adding moisture and enhancing the chocolatey flavor.
5. Baked Donuts or Cookies
If you’re feeling adventurous, drizzle or spread some chocolate fudge icing over freshly baked donuts or cookies. The icing will harden slightly on top, giving a glossy, satisfying finish while enriching the flavor of the dough or cookie base. A great combo is a classic chocolate chip cookie with a thin layer of fudge icing.
6. Fruit-Based Desserts
Chocolate and fruit are an iconic pairing, so don’t hesitate to pair chocolate fudge icing with fruit-based desserts. Consider topping a light, fluffy sponge cake filled with berries, or drizzle it over roasted fruit like pears or apples for a more rustic dessert. The acidity of the fruit complements the sweetness of the fudge icing beautifully.
7. Ice Cream
If you’re a fan of over-the-top indulgence, use chocolate fudge icing as a decadent drizzle over ice cream. Whether it’s a scoop of vanilla, chocolate, or even a fruit-flavored ice cream, the rich fudge will complement the creamy texture and take the dessert to a whole new level.
Conclusion
Mary Berry’s Chocolate Fudge Icing is a timeless classic that enhances any dessert with its rich, velvety texture and deep chocolate flavor. Whether you prefer to keep it traditional or experiment with variations like salted caramel, mint, or espresso, the icing offers endless possibilities to suit every taste.
Storing leftovers is easy, and with proper care, you can keep this decadent treat fresh for future baking projects. From chocolate cakes to brownies, cupcakes, and even ice cream, this icing pairs wonderfully with an array of desserts, offering versatility and indulgence in every bite. Whether you’re baking for a special occasion or just treating yourself, this chocolate fudge icing is guaranteed to bring joy to your taste buds.
FAQs
What Ingredients Are Needed For Mary Berry’s Chocolate Fudge Icing?
The key ingredients for Mary Berry’s chocolate fudge icing are dark chocolate, butter, double cream, icing sugar, and golden syrup. These combine to create a rich, smooth, and glossy finish perfect for cakes and cupcakes.
Can I Use Milk Chocolate Instead Of Dark Chocolate For The Icing?
Yes, you can substitute milk chocolate for dark chocolate in Mary Berry’s chocolate fudge icing recipe. However, using milk chocolate will result in a slightly sweeter and less intense flavor compared to dark chocolate.
How Do I Make Sure The Icing Is Smooth And Lump-free?
To achieve a smooth, lump-free texture, melt the chocolate gently and mix it thoroughly with the butter and cream. If any lumps form, you can pass the mixture through a fine sieve to remove them. Stir constantly to ensure everything is well blended.
Can I Use Margarine Instead Of Butter In The Fudge Icing?
While margarine can be used as a substitute for butter, it may slightly affect the flavor and texture of the icing. Butter gives the icing a richer taste and a creamier consistency, so using butter is recommended for the best result.
How Long Does The Chocolate Fudge Icing Take To Set?
The icing will set relatively quickly at room temperature, typically within 30 to 60 minutes. If you want to speed up the process, you can place the cake in the fridge for about 20 minutes. However, be careful not to let it set too hard, as it may become difficult to spread.
Can I Make The Icing In Advance And Store It?
Yes, you can prepare the chocolate fudge icing in advance. Store it in an airtight container at room temperature for up to 2 days or refrigerate it for longer storage. Before using, let it come to room temperature and give it a good stir to restore its smooth consistency.
What Type Of Cake Goes Best With Mary Berry’s Chocolate Fudge Icing?
Mary Berry’s chocolate fudge icing pairs wonderfully with a variety of cakes, particularly chocolate cakes, vanilla sponge cakes, and even fruit cakes. It’s also a perfect topping for cupcakes and brownies.
How Do I Adjust The Consistency Of The Chocolate Fudge Icing?
To adjust the consistency, you can add more cream if the icing is too thick, or more icing sugar if it’s too thin. The goal is to achieve a thick yet spreadable texture that holds its shape when applied to the cake.
Can I Use This Chocolate Fudge Icing For Piping Decorations?
Yes, Mary Berry’s chocolate fudge icing can be used for piping. However, to make it pipeable, you may need to let it cool slightly and then beat it to stiffen it up a bit. It should hold its shape when piped but remain smooth enough to flow easily through the piping bag.
How Do I Prevent The Chocolate Fudge Icing From Cracking After It Sets?
To prevent cracking, make sure to not overheat the chocolate during melting and avoid over-whipping the icing. Ensure it’s spread evenly and not too thick in any areas, as thick patches may cause cracking as the icing sets.
![Mary Berry Caramel Square Recipe [Tips & Tricks]](https://famousyummyrecipes.com/wp-content/uploads/2025/03/caramel-square.jpg)
![Mary Berry Celeriac Soup With Crispy Pancetta And Poppy Seed Croutons Recipe [Tips & Tricks]](https://famousyummyrecipes.com/wp-content/uploads/2025/03/celeriac-soup-with-crispy-pancetta-and-poppy-seed-croutons.jpg)
![Mary Berry Raspberry Pavlova Recipe [Tips & Tricks]](https://famousyummyrecipes.com/wp-content/uploads/2025/03/raspberry-pavlova.jpg)
![Mary Berry Thai Green Chicken Noodle Soup Recipe [Tips & Tricks]](https://famousyummyrecipes.com/wp-content/uploads/2025/03/thai-green-chicken-noodle-soup.jpg)
![Mary Berry French Dressing Recipe [Tips & Tricks]](https://famousyummyrecipes.com/wp-content/uploads/2025/03/french-dressing.jpg)
![Mary Berry Mini Apple And Almond Cakes Recipe [Tips & Tricks]](https://famousyummyrecipes.com/wp-content/uploads/2025/03/mini-apple-and-almond-cakes.jpg)