
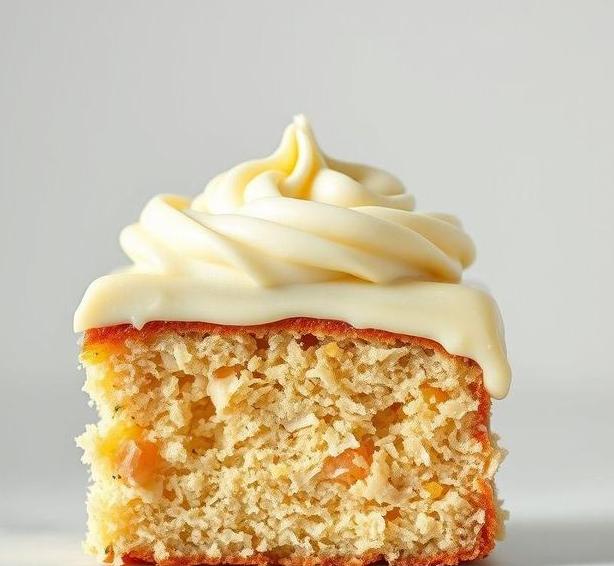
Mary Berry White Chocolate Icing Recipe [Tips & Tricks]
Note: This page contains affiliate links.
As an Amazon Associate, I earn from qualifying purchases when you click on the link, but you are not charged extra.
If you’re looking to elevate your baking game, Mary Berry’s white chocolate icing recipe is an absolute must-try!
This creamy, rich icing brings the perfect balance of sweetness and smooth texture that complements almost any cake or cupcake. What sets it apart is the luxurious flavor from the white chocolate, making it more indulgent than your regular buttercream or fondant. It’s surprisingly easy to whip up, and the result is both visually stunning and delicious. Whether you’re making a celebration cake or just a simple treat, this icing will take your dessert to the next level!
Mary Berry White Chocolate Icing Recipe
Ingredients Needed
To make Mary Berry’s white chocolate icing, you will need a select few ingredients that blend together to create a rich, smooth, and velvety finish for cakes, cupcakes, or any other sweet creations. Each ingredient plays a crucial role in both flavor and texture. Here’s what you’ll need:
-
White Chocolate: The star of this icing!
Choose a high-quality white chocolate bar, which typically contains cocoa butter, sugar, and milk solids. The quality of your chocolate will directly affect the final taste and smoothness of your icing, so avoid cheap, waxy white chocolate. Ideally, aim for a chocolate with a cocoa butter content of at least 30% to get the best flavor and texture.
-
Butter: Unsalted butter is the best option here, as it allows for greater control over the seasoning of your icing. The butter adds a rich, creamy texture and a slightly savory undertone, which balances out the sweetness of the chocolate.
-
Icing Sugar (Powdered Sugar): This is essential for sweetening and thickening the icing. Icing sugar dissolves easily, creating a smooth finish without any grittiness. It also helps to achieve the stiff consistency needed for spreading or piping.
-
Double Cream: This ingredient is used to help smooth out the icing, giving it a luscious, silky finish. Double cream, or heavy cream, is preferred for its high fat content, which helps to make the icing more indulgent and manageable.
-
Vanilla Extract (optional): A splash of pure vanilla extract can enhance the flavor of the icing. It’s optional, but it provides a warm, aromatic depth that complements the sweetness of the white chocolate.
Equipment Needed
To prepare this white chocolate icing, you don’t need an extensive array of specialized tools, but there are a few essential pieces of equipment to make the process easier and more efficient. Here’s what you’ll need:
-
Mixing Bowls: You’ll need at least two mixing bowls – one for melting the chocolate and another for combining the ingredients once they’re ready. Ensure that the bowls are large enough to accommodate all your ingredients, and opt for heatproof bowls for the chocolate melting process.
-
Saucepan or Heatproof Bowl for Melting: For melting the white chocolate, a heatproof bowl over a saucepan of simmering water (double boiler method) or a microwave-safe bowl will do the trick. This gentle method prevents the chocolate from seizing or burning.
-
Electric Mixer or Hand Whisk: You’ll need something to whip the icing ingredients together. An electric mixer (stand or hand-held) will speed up the process and help incorporate air into the mixture, creating a light, fluffy icing. A hand whisk can also work if you prefer a more manual approach.
-
Spatula: A silicone or rubber spatula is perfect for scraping down the sides of the bowls and mixing the ingredients together thoroughly. It’s also handy when transferring the icing to your cake or cupcakes.
-
Piping Bag and Tips (optional): If you’re looking to pipe the icing onto your cakes or cupcakes, a piping bag with your preferred nozzle (e.g., a star or round tip) will help create smooth, decorative swirls or neat finishes.
How To Make Mary Berry’s White Chocolate Icing
Creating Mary Berry’s white chocolate icing is a simple yet rewarding process. Follow these steps for an icing that is both luscious and elegant:
-
Melt the White Chocolate: Begin by breaking the white chocolate into small pieces or chopping it up. Place it in a heatproof bowl over a pan of simmering water (making sure the water doesn’t touch the bowl) and gently stir the chocolate as it melts. Alternatively, you can microwave the chocolate in short bursts (15-20 seconds), stirring in between. Once fully melted, set aside to cool slightly.
-
Prepare the Butter: In a separate bowl, soften the unsalted butter at room temperature. Once soft, beat it with a mixer until it becomes light and fluffy. This should take a few minutes.
-
Incorporate the Icing Sugar: Gradually sift the icing sugar into the softened butter, mixing thoroughly between each addition. It’s important to add the icing sugar slowly to avoid it flying everywhere and to ensure a smooth consistency.
-
Add the Double Cream: Once the butter and icing sugar are fully combined, pour in the double cream and beat the mixture again. This will help to loosen the consistency, making it easier to spread or pipe later.
-
Combine with White Chocolate: Now, take your slightly cooled melted white chocolate and slowly pour it into the butter mixture, continuing to beat everything together until it forms a smooth, cohesive icing. If desired, add a few drops of vanilla extract for extra flavor.
-
Final Whisking: Give the icing one last good whisk to ensure everything is well blended and the texture is smooth and silky. At this point, your white chocolate icing is ready for use!
-
Decorate: Use a spatula to spread the icing over cakes or cupcakes, or transfer it into a piping bag to create decorative designs. The icing will firm up as it sets, so it’s perfect for achieving a neat finish.
Expert Tips
-
Temperature Matters: Be cautious not to overheat the white chocolate while melting. White chocolate can burn easily, so use a gentle heat, whether over a double boiler or in the microwave. If you’re using the microwave, melt it in short intervals, stirring frequently.
-
Butter at Room Temperature: For the best consistency and texture, make sure the butter is at room temperature before starting. Cold butter will not incorporate well into the icing and could create lumps.
-
Consistency Control: If your icing turns out too thick, add more double cream a teaspoon at a time until you reach the desired consistency. If it’s too runny, sift in a bit more icing sugar to thicken it up.
-
Chill for Firmer Icing: If you want a firmer, more stable icing (especially for piping), you can refrigerate the icing for a short time before using it. This will help it hold its shape better.
-
Flavor Variations: For a subtle flavor twist, consider adding finely grated lemon zest, orange zest, or a dash of almond extract to the icing. These small changes can elevate the taste without overpowering the sweetness of the white chocolate.
Mary Berry’s white chocolate icing is a beautiful and versatile option for topping cakes, cupcakes, and pastries, offering a silky smooth texture and rich, indulgent flavor. By carefully selecting high-quality ingredients and following the easy steps outlined, you can achieve a flawless icing that will impress both visually and in taste.
Whether you’re a seasoned baker or just starting out, this icing is the perfect choice for any occasion, bringing a touch of elegance and sweetness to your homemade desserts. With a few simple tweaks and expert tips, you’ll have an irresistible icing that complements a wide range of baked goods, from delicate sponges to decadent chocolate cakes.
Easy Recipe Variations For Mary Berry’s White Chocolate Icing
Mary Berry’s white chocolate icing is a beautifully rich, sweet topping that can elevate a variety of baked goods, from cupcakes to sponges. While her classic recipe is absolutely delicious, there are many fun variations you can experiment with to tailor the icing to your specific taste and occasion. Here are some easy modifications you can try:
1. Infused White Chocolate Icing
To add depth and complexity to the flavor, consider infusing your white chocolate icing with different flavors. A simple and popular method is to steep a few sprigs of fresh mint or a strip of orange peel in the cream before melting the chocolate.
Once the cream is infused, strain it to remove the solids, and then mix it with the melted white chocolate as per the recipe. These infusions provide a refreshing twist to the icing and pair perfectly with lighter cakes such as lemon or vanilla.
2. Adding A Splash Of Liqueur
For adult-themed treats, adding a splash of liqueur to the icing can create a sophisticated flavor profile. A tablespoon of Chambord (black raspberry liqueur) or Grand Marnier (orange liqueur) can transform the white chocolate icing into a decadent topping with a fruity or citrusy flair. The key is to ensure you don’t overpower the icing; start with a small amount and taste test as you go.
3. White Chocolate And Berry Icing
Mixing white chocolate with fresh berries can result in a unique and colorful icing. Puree a handful of raspberries, strawberries, or blackberries and incorporate them into the melted white chocolate.
This variation will add a fruity tang that contrasts beautifully with the sweetness of the white chocolate. The natural color of the berries can also give the icing a lovely pinkish hue, making it visually appealing.
4. Crispy White Chocolate Icing
If you’re after some texture, you can add crispy rice cereal or crushed praline nuts to your icing to give it a delightful crunch. Fold these into the icing after it’s fully mixed, just before applying it to your cake or cupcakes. This extra texture can make the icing stand out in both taste and appearance, perfect for a fun twist on traditional white chocolate frosting.
5. Vegan White Chocolate Icing
For a plant-based variation, you can swap the white chocolate for a vegan-friendly alternative. There are several brands that offer dairy-free white chocolate made from coconut, rice, or almond milk. Substitute the cream for a non-dairy option such as coconut cream or almond milk, and the result is a rich, dairy-free white chocolate icing that’s just as indulgent as the original.
Each of these variations offers a unique twist on the classic recipe, ensuring that your white chocolate icing is never boring and always tailored to your tastes.
Best Practices To Store Leftovers
White chocolate icing can be a rich and indulgent topping, and it’s not uncommon to end up with leftovers. Fortunately, it stores well if handled properly. Here are some best practices to ensure your leftover white chocolate icing stays fresh and maintains its texture:
1. Cool It Down Properly
If you’ve just made the white chocolate icing, allow it to cool down to room temperature before storing it. Placing hot icing in a container can cause condensation, which may alter the texture and consistency once refrigerated.
2. Airtight Container
Store the icing in an airtight container to prevent it from absorbing any unwanted odors from the fridge. A tightly sealed container will also help maintain the smooth, creamy texture of the icing. If you don’t have an airtight container, wrapping the container tightly with plastic wrap before sealing with a lid can also help.
3. Refrigeration
White chocolate icing should be refrigerated if you plan on storing it for more than a couple of hours. The icing will harden when chilled, so it’s important to allow it to soften before using it again. Simply remove it from the fridge and let it come to room temperature, or gently warm it in the microwave in 10-second intervals, stirring each time to ensure it doesn’t overheat or burn.
4. Freezing For Long-Term Storage
If you want to store the icing for a longer period, freezing it is an excellent option. Transfer the cooled icing into a freezer-safe, airtight container and freeze for up to three months. When ready to use, thaw it overnight in the fridge, and then allow it to come to room temperature before re-whipping it to restore its creamy texture.
5. Re-whipping Before Use
Whether refrigerated or frozen, white chocolate icing may lose some of its original texture when stored. Before using leftover icing, gently re-whip it with a hand mixer or stand mixer for a few minutes. This process will help restore its smooth, fluffy consistency.
By following these simple storage practices, your leftover white chocolate icing can stay fresh and ready to be used for your next baking adventure.
What Goes Well With White Chocolate Icing
White chocolate icing is creamy, sweet, and luxurious, which makes it the perfect complement to a variety of baked goods and desserts. It pairs beautifully with both delicate and bold flavors, offering a versatile touch for any occasion. Here are some great pairings to try:
1. Berry-Flavored Cakes And Pastries
The sweetness of white chocolate icing is a perfect match for the tang of fresh berries. Think raspberry, strawberry, blackberry, or blueberry cakes.
The acidity and freshness of the berries balance the richness of the icing, creating a harmonious flavor profile. You can also add a berry compote or fresh fruit on top of the icing for extra flavor and a pop of color.
2. Citrus-Based Desserts
The bright, zesty flavors of citrus fruits such as lemon, lime, and orange provide a wonderful contrast to the creamy sweetness of white chocolate. A lemon drizzle cake or a lime-flavored cupcake with a swirl of white chocolate icing will delight your taste buds with its perfect balance of sweet and tangy. Consider zesting a bit of citrus into the icing for an extra citrusy kick.
3. Nutty And Caramel Flavors
The richness of white chocolate icing pairs exceptionally well with the deep, earthy flavors of nuts like pistachio, almond, or hazelnut. For a decadent treat, try a pistachio cake or a hazelnut coffee cake topped with a generous layer of white chocolate icing. Additionally, caramel-flavored desserts such as a salted caramel cake or caramel-filled cupcakes make a delicious contrast to the sweetness of the icing.
4. Spices And Autumn Flavors
White chocolate icing also complements spiced cakes and baked goods, particularly during the fall months. Consider pairing it with cakes flavored with cinnamon, nutmeg, ginger, or cloves, such as a spiced pumpkin cake or gingerbread cookies. The warmth of the spices blends beautifully with the smooth, sweet icing, creating a comforting and cozy flavor experience.
5. Chocolate-Based Desserts
While it might sound counterintuitive, white chocolate icing works wonderfully with chocolate cakes or brownies. The creaminess of the white chocolate balances out the richness of the dark chocolate, providing a light, sweet contrast. This pairing is especially popular in layered cakes or as a topping for chocolate cupcakes.
These flavor pairings highlight the versatility of white chocolate icing, allowing it to complement a wide variety of desserts and making it suitable for any event, from a casual gathering to a sophisticated celebration.
Conclusion
Mary Berry’s white chocolate icing is a classic favorite in the baking world, offering a rich and creamy topping that enhances cakes, cupcakes, and other pastries. Its versatility allows for a multitude of variations, from infused flavors to adding crunchy textures or adapting it for vegan diets.
Storing leftovers properly ensures that this indulgent icing stays fresh for future use, whether in the fridge or freezer. Additionally, the icing pairs beautifully with a wide range of flavors, from berries and citrus to nuts and spices, making it an ideal companion for various desserts. Whether you’re baking a special cake for a celebration or simply treating yourself to a sweet indulgence, white chocolate icing is a delightful choice that will never disappoint.
FAQs
What Ingredients Are Needed For Mary Berry’s White Chocolate Icing?
Mary Berry’s white chocolate icing requires simple ingredients: white chocolate, double cream, butter, and a little bit of vanilla extract for flavor. These ingredients combine to create a smooth, rich icing that’s perfect for cakes and cupcakes.
How Do I Make Mary Berry’s White Chocolate Icing?
To make the icing, melt the white chocolate and mix it with warm double cream until smooth. Then, add softened butter and vanilla extract.
Stir everything together until the mixture thickens to a spreadable consistency. Let it cool before using.
Can I Use A Different Type Of Chocolate For Mary Berry’s Icing Recipe?
While the recipe specifically calls for white chocolate, you can experiment with milk or dark chocolate for a different flavor profile. However, keep in mind the consistency and sweetness will vary depending on the type of chocolate used.
How Long Does Mary Berry’s White Chocolate Icing Take To Set?
After making the icing, it should be allowed to cool and set for about 20 to 30 minutes, depending on the room temperature. The icing will firm up as it cools, so it’s best to use it once it reaches a spreadable consistency.
Can I Store Mary Berry’s White Chocolate Icing?
Yes, you can store the white chocolate icing in an airtight container in the fridge for up to 3 days. Before using, bring it to room temperature and give it a good stir to restore its smooth texture.
Is Mary Berry’s White Chocolate Icing Suitable For Vegan Diets?
No, the traditional recipe includes butter and cream, which are not vegan. However, you could substitute with vegan butter and a non-dairy cream to make a vegan-friendly version of the icing.
How Do I Make Mary Berry’s White Chocolate Icing Thicker?
If the icing is too thin, you can chill it for a little while in the fridge to help it thicken. Alternatively, add more melted white chocolate, a little at a time, to reach the desired consistency.
Can I Color Mary Berry’s White Chocolate Icing?
Yes, you can color white chocolate icing with food coloring. Gel-based food colors work best, as they won’t affect the texture of the icing. Add a few drops at a time and mix thoroughly until the desired color is achieved.
Can I Use Mary Berry’s White Chocolate Icing For Piping Decorations?
Yes, this white chocolate icing can be used for piping. Ensure that it has cooled enough to thicken to a consistency that will hold its shape when piped. If it’s too runny, let it cool a little longer before attempting to pipe.
What Cakes Or Desserts Go Well With Mary Berry’s White Chocolate Icing?
Mary Berry’s white chocolate icing pairs wonderfully with vanilla, raspberry, or lemon cakes. It also works well on cupcakes, cheesecakes, and even layered tarts or cookies, complementing both fruity and delicate flavors.
![Mary Berry Stuffed Pork Loin Recipe [Tips & Tricks]](https://famousyummyrecipes.com/wp-content/uploads/2025/03/stuffed-pork-loin.jpg)
![Mary Berry Spicy Sausage Rolls Recipe [Tips & Tricks]](https://famousyummyrecipes.com/wp-content/uploads/2025/03/spicy-sausage-rolls.jpg)
![Mary Berry Lemon Victoria Sponge Recipe [Tips & Tricks]](https://famousyummyrecipes.com/wp-content/uploads/2025/03/lemon-victoria-sponge.jpg)
![Mary Berry Blue Stilton And Onion Soup Recipe [Tips & Tricks]](https://famousyummyrecipes.com/wp-content/uploads/2025/03/blue-stilton-and-onion-soup.jpg)
![Mary Berry Peanut Butter Cookies Recipe [Tips & Tricks]](https://famousyummyrecipes.com/wp-content/uploads/2025/03/peanut-butter-cookies.jpg)
![Mary Berry Rice Pudding Recipe [Tips & Tricks]](https://famousyummyrecipes.com/wp-content/uploads/2025/03/rice-pudding.jpg)